How to Install Your Bosch Dishwasher

How to Install Your Bosch Dishwasher

With all these cool do-it-yourself techniques out there, it’s easy to think you can do anything yourself. Sometimes you just want to save a little bit of money and figure it out on your own. Other times it’s not that easy, and should be left up to the professionals. If you’re planning on installing your new Bosch Dishwasher, check out the steps below to make sure you do it right on this D.I.Y. Dishwasher project.

Turn Off the Water and Power

So now that you have a new dishwasher, the first step is to read the Installation Manual…cover to cover and then the next step is to turn off the water under the sink and the power to your dishwasher. If you forget to do one or both of these steps, you could end up with a mess on your hands. Once you’re past that simple, yet very important part, remove the access panel at the bottom of your Bosch Dishwasher. This part can be sharp, so be careful! Set it aside for now.

Slide in the Dishwasher

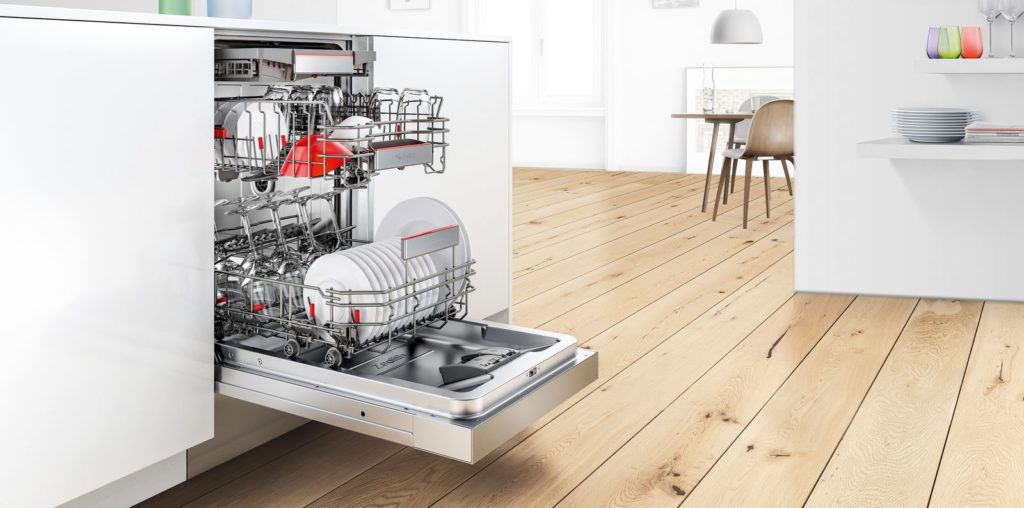
Before pushing in your shiny new appliance, you’ll want to make sure the drain hose is pulled through the cabinet wall. With that out of the way, gently move your dishwasher under the counter where it will seamlessly fit in. If your dishwasher is too short, easily adjust the legs at the bottom so that they are level, and lock them into place with screws. You’ll also want to screw in the mounting bracket on top of the dishwasher to countertop to make sure it doesn’t fall forward when the door is open.

Bosch Dishwasher Installation

Adjust the Drain Hose

Take the drain hose that you slid through the cabinet, and pull the whole thing through. You’ll then connect it to the sink drain or garbage disposal with a clamp. You’ll want to make sure your hose is higher than where it’s connected so there are no draining issues. Use a zip tie to tie the hose to something above the connection, ensuring there won’t be any problems.

Junction Box

Locate the junction box, behind the access panel, to unscrew the junction box cover and reveal 3 screws: gold, silver, and green. Loosen each screw a little bit so that you can connect the power cable wires to their matching slots. Each dishwasher may be a little different here so it’s important that you read the manual for this specific part

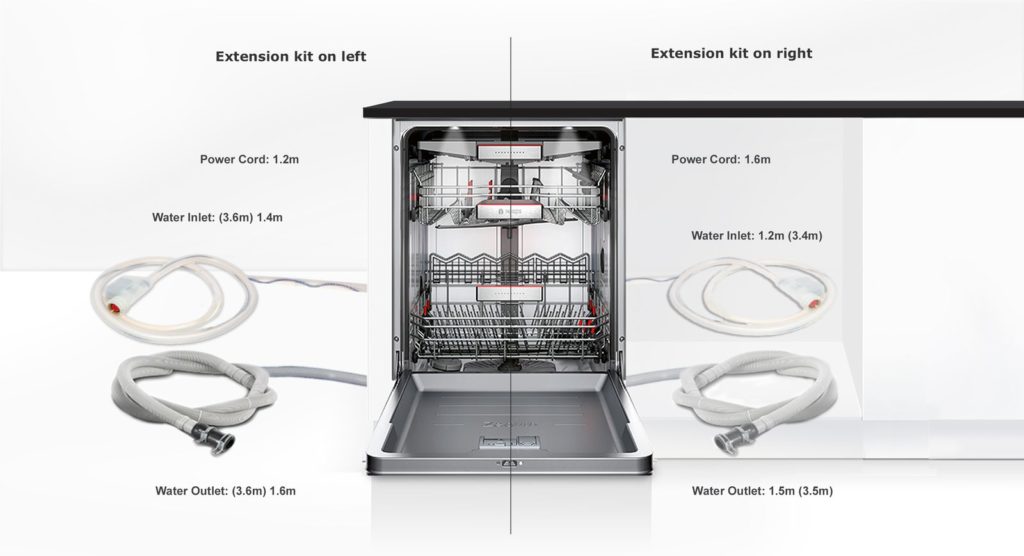
Connect Water Supply Line to the Inlet Valve

With the access panel off, you can easily see the inlet valve, which you will connect to the water supply line. There is a chance that water is still in the drain from when the manufacturers tested out your appliance so be prepared for some water to possibly pour out. You are now ready to turn on the power and water! Do this and run the dishwasher through a short cycle. Check occasionally to make sure that there aren’t any leaks. If everything looks good, put the lower access panel back on your Bosch dishwasher.

If you’re able to make it all the way to the end, congratulations! It’s no easy feat to install a dishwasher, but with the right tools and information, you’ll be done in less than an hour. If you need help installing your Bosch Dishwasher, let us know, and we’d be happy to assist!

Amanda, Your Appliance Expert

4 Storage Features to Look for in a New Refrigerator

4 Storage Features to Look for in a New Refrigerator

When it comes time to buy a new refrigerator there are a lot of great options to consider before you run out and make the purchase. While it may seem overwhelming and you might think to yourself, ‘isn’t a fridge just a fridge?’ today’s new refrigeration options will actually help you in life. No joke. With a variety of storage solutions, spaces and places for keeping food fresher longer, and so much more there is a refrigerator option for every home and lifestyle.

With that in mind, we’ve pulled together four of our favourite storage features you might want to look for in your new fridge.

1) Refrigerator Drawer Options

With a variety of drawer options and configurations to choose from, it’s as simple as looking at what you need from your fridge. For every need, today’s fridges have the solutions.

Drawer options in refrigerators

Crispers for fruits and veggies, and deli drawers are just the start of your options. Do you need those various drawers to have temperature controls for things like cheese or fresh veggies? With options for all your culinary requirements, it’s helpful to list out what foods you regularly have in the fridge, how you store them, and what you’d like improve.

And don’t worry, with all that today’s new refrigerators offers and provides, you have the option to move and reconfigure your fridge to suit every grocery shop and dinner party.

2) Refrigerator Door Storage Solutions

Door Storage in Refrigerator

Another place to look for storage solutions is the door, either the door shelving inside, door in door solutions, or both. If you regularly have large juice jugs or pitchers of margaritas (we can dream!) having tall storage on the door is always helpful. Some manufacturers offer the option to open a compartment from the outside with access to select items inside without letting the main compartment fill with hot air. These door-in-door options are relatively new and are great for entertainers. Hot tip: while super handy, in-door ice and water dispensers both take up valuable storage space on the inside of the fridge.

Shop Refrigerators

3) Refrigerator Shelving Options

Adjustable shelving, wire shelving, glass shelving, and retractable shelving all offer unique storage solutions for your refrigerator.

Wire shelving is usually found on lower end models and generally offers the least amount of flexibility. Shelving split in the middle allows for the most amount of flexibility for your grocery needs and is also great for holiday time when you need to change the fridge storage in turkey sized ways.

One of the greatest shelving options for today’s refrigerators is one of my favourites, retractable shelving. Retracting into the fridge space allowing for taller items to fit nicely is a game changer for anyone who regularly entertains.

Refrigerator with retractable shelf

Another great innovation is sliding shelving. Sliding shelves allow access to the back of the fridge in a much more efficient way. This is great for anyone, but particularly handy for homes with older people or those with trouble bending over.

4) Super Specific Storage Solutions

Use lots of fresh herbs and want an herb drawer? There’s a fridge for your fresh herbs that does just that! Want your fridge to have all the flexibility of a Yoga instructor? There’s one out there doing that too!

Herb storage in refrigerator

From Apples to Zucchini and everything in between, there is a fridge storage solution for your family. Think it’s time for a new refrigerator? Read our Refrigerator Buying Guide for ALL the information you need and shop our wide assortment of fridges; we’ve got one made just for you.

Shop Refrigerators

Isabelle, Your Appliance Expert

The Pros and Cons of Matching Appliances

The Pros and Cons of Matching Appliances

Whether you are doing a full kitchen renovation or just updating some dated appliances, putting together a whole new look for your home can be exciting, but a little intimidating too. One question I often get asked is whether it’s better to match appliances or mix it up. The truth is, there’s no wrong answer here.

If you want to have a perfectly matching kitchen ensemble to unify your space and take advantage of in-brand features, then you’ll want to go with brand matching kitchen appliances.

If you want to have the best performing appliance in each category and aren’t concerned with a perfect match – or if you want to create a unique kitchen that better reflects your needs, then mixing and matching appliances is the way to go.

Still can’t decide? Well, then, without further ado: the pros and cons of matching kitchen appliances.

PRO: Nothing Beats a Perfect Match

Matching Appliances in a Kitchen

Matching Finish: If you want your appliance finishes to exactly match, then you need to stay in-brand. Whites, blacks, stainless steels, and especially new finishes such as black stainless steel differ from brand to brand. Buying kitchen appliances from the same brand is the safest choice; the matching finishes will unify your kitchen and reduce the risk of a design faux pas.

Integrated Design: Speaking of design, matching kitchen appliances come with distinct features that unify and compliment when installed as part of an ensemble. Matching finishes, matching handles, and design elements such as curved lines or LED accents tie everything together visually. And integrated features such as the Bluetooth connectivity in Samsung’s Chef Collection let your appliances work together and expand on the functionality of your kitchen.

Package Savings: The more you buy, the more you save when it comes to kitchen appliances. Manufacturers want you to buy all your appliances in the same brand and will often advertise aggressive promotions and package savings to entice you to shop in one line.

Simplified Shopping: Buying matching kitchen appliances eliminates a lot of the guesswork. You’ll save time, and you’ll save headaches. Choose a brand you like, shop around for the best price, and just like that – your kitchen problems are solved.

Shop Kitchen Appliances

CON: You Can’t Judge an Appliance by Its Cover

Kitchen Design with Panel Ready Fridge
Source: Olivier Simon Design

Not Created Equal: Every brand has its strengths and weaknesses, and when you bundle a brand, you’re forced to take the good with the bad. If that wasn’t enough, many brands don’t offer specialty appliances, or sometimes even certain standard appliances if it’s a brand new finish or design. Keep in mind that if you’re a feature first shopper who really needs that built-in coffee machine, then you may be limited in your in-brand appliance choices.

Cookie Cutter Design: One of the biggest downsides of a matching kitchen is its cookie-cutter feel. No matter how you slice it, hundreds and maybe thousands of people have a kitchen that’s the same as yours.

Less for Your Money: Buying within a single appliance line does give you access to manufacturer’s savings, but you may miss out on in-store savings, and one-off deals if you’re willing to mix and match. Often times these savings can far surpass those offered at the manufacturer’s level.

Another thing to keep in mind is that with panel ready finishes and pocket handle designs, it’s easier to cheat a match between brands than you might think. And depending on your design elements, with a little creativity, it is possible to mix and match finishes and colours to create a stunning effect.

Whichever you decide, be sure to check out our BrandSource Appliance Buying Guides. They’re the perfect place to start planning your kitchen. From the ins and outs, and ups and downs; they’ll give you everything you need to know about home appliances.

Isabelle, Your Appliance Expert

5 Colour Innovations from Whirlpool Appliances

Whirlpool Stainless Steel Appliance Finish

You dress to look your best. So why would you do any less for your home? Your kitchen? Choosing the right appliances will make or break your kitchen. It doesn’t matter how much you spent on that renovation if you end up in the wrong finish. You want a look that’s daring, something cutting edge, something top of the line. We hear that.

Whirlpool appliances come in finishes to match any style. From sleek and modern, to a classic throwback there’s a look to complete any kitchen. So, what’s your fit?

Fingerprint Resistant Stainless Steel

Whirlpool Fingerprint Resistant Finish

Hail to the King, baby. For more than twenty-five years, stainless steel has been the finish in kitchen appliances. And it’s hard to argue with perfection. Except… The fingerprints.

It’s hard to pull off that high-end professional style when you’re flashing smudges down your front. That’s why Whirlpool’s introduced the most effective fingerprint resistant stainless steel you can buy.

Whirlpool’s innovative fingerprint resistant stainless finish gives you everything you want. A rich matte professional-looking appliance without the mess. Fewer fingerprints, less cleanup – this is what next-gen stainless looks like.

Shop Stainless Steel Kitchen Appliances from Whirlpool

Black Stainless Steel

Whirlpool Black Stainless Steel Finish

Whirlpool’s new Black Stainless Steel finish is the tall dark and handsome update stainless steel has been waiting for. The elegant brushed metal gives you a rich tone with more fingerprint resistance in the matte finish. The hottest appliance trend of 2019, black stainless is making a name for itself, and with options across its entire line, Whirlpool is leading the charge.

Word of warning here, though. Black Stainless Steel is not as durable as regular stainless steel. Most black stainless steel finishes are coated atop of traditional steel panels. As a result, the smallest scratch stands out like a beacon. If you have small children, or your appliances are going to be in high traffic areas you may want to consider traditional stainless steel or black appliances instead.

That being said, if you’re leaning towards a high contrast modern kitchen design, adding some pop to an industrial kitchen, or even updating appliances in an existing kitchen with dark natural wood cabinets then Black Stainless Steel could be the perfect finish for you.

Shop Black Stainless Steel Kitchen Appliances from Whirlpool

Sunset Bronze

Whirlpool Sunset Bronze Appliance Finish

With a look over their shoulder, Whirlpool brought a vintage inspiration to their newest and hottest finish, Sunset Bronze. With Rose-Gold undertones, this warm stainless steel is absolutely stunning and its neutral tones are perfect in any open kitchen.

Like the black and new stainless steel collections, Sunset Bronze appliances are fingerprint resistant so you’ll get a maximum look with a minimum fuss. Sunset Bronze is a great compliment to any design featuring light colours, natural wood cabinetry or earthy tones. And if you’ve been waiting for an opportunity to upgrade those older Almond or Beige appliances, then wait no more Sunset Bronze is a near-perfect replacement.

On the downside, Sunset Bronze is relatively new and not market-tested. Simply put, there’s no guarantee the finish will be available in a few years if you need to replace a broken appliance.

But what the heck, live dangerously. Sunset Bronze is just that good looking.

Shop Sunset Bronze Kitchen Appliances from Whirlpool

Snow White

Whirlpool White Appliance Finish

This isn’t your grandmother’s white finish. White goes way back to the first appliances, but Whirlpool’s brought white finishes into the Twenty-First Century with a sleek reboot. The perfect complement to any kitchen and cabinet colour, this new white finish will pop in any kitchen while adding a down-to-earth elegance to it that cold stainless steel can’t match.

White appliance finishes always had a clean look, and when you consider how high maintenance stainless steel finishes are, there’s no contest. If you have small children, or your kitchen gets a lot of use then you may want to consider a brilliant white finish from Whirlpool.

Shop White Kitchen Appliances from Whirlpool

Back in Black

Whirlpool Black Appliance Finish

Don’t call it a comeback, black has been around for years. Sitting back here, making everybody look good. The perfect match to dark cabinetry, high contrast or minimalist kitchen designs, black brings elegance to any modern or throwback look.

Perfect for large kitchens, and ultra-modern designs, black finishes tend to darken a room so they’re not amazing for small spaces, or someone looking for a cozy, more homey vibe.

If you’re looking for a low maintenance option, then black has you covered. Black finishes hide smudges and wipe clean easily. If you’ve got little one running around, then black is definitely something to consider.

Shop Black Kitchen Appliances from Whirlpool

And just like that, Whirlpool’s got you and your appliances covered. With Brandsource and Whirlpool new class of designer finishes, there’s never been a better time to buy.

Isabelle, Your Appliance Expert

How to Make Your Living Room Cozier for Winter

Signature Design Living Room 80603

The winter chill is setting in and suddenly you just can’t get enough of flannels and turtlenecks. If cold, cold, cold is all you can think about these days, it might be time to give your living room a cozy makeover.

When temperatures drop, you’ll want your home to feel like your haven from the chilly breezes outside. Luckily, you don’t have to go in for a major remodel to make your space warm and inviting! With some décor know-how, a few new pieces of furniture from Signature Design by Ashley, and some creative rearranging, you and your home can enjoy a cozy winter.

Colour With Care

Colours can have a big impact on the feel of your home! Any colour can be used to make a space feel comfier and cozier, but the trick is using your colours right.

For example, Scandinavian style uses whites and pale blues – a traditionally chilly colour palette – to bring warmth and sunshine into a space. Inspired by dreary, grey northern winters, this style soaks up and reflects every drop of light, making your space feel warm and welcoming no matter the time of year. This kind of pale, bright colour palette can help lighten up your home during even the darkest storms!

On the other hand, dark colours and shades of red are also known to do wonders for heating up a space and making it feel more comfortable. Dark woods paired with browns, reds, and oranges give your space a touch of summer all season long, while keeping your style tasteful and elegant. Select your colour scheme carefully and you’ll set a strong foundation for your cozy new living room.

Pattern Master

Once you’ve picked out your colour scheme, it’s time to find patterns to match. Fun patterns can help cushion stark walls or chilly wooden furniture. For the winter, think plaids, houndstooth, or even animal prints to add a splash of fun and warmth to your space.

If you prefer a more understated look, keep the colours simple. Even monochrome patterns can add that splash of visual interest and movement you need to make your home feel more inviting.

Toy With Textures

Playing with Texture A1000568

Don’t be afraid to go crazy with textures! Go bold, mix and match, use textures that make you do a double take – it all contributes to that comfy cozy look you’re going for. Knit, corduroy, and faux sheepskin are all lovely textures to incorporate that will keep your home looking elegant and stylish, while adding that dose of cozy you’re looking for. Whether you’re looking at upholstered seating or funky décor, we’ve got home accessories and furniture with tons of textures to choose from, so stop by our store to see our Signature Design selection!

Shop Signature Design by Ashley Furniture and Accessories

Layer Up

Layers are everything when it comes to achieving a cozy living space. Cover your couches in throw blankets and cushions, or even double up your rugs to create an elevated take on a patchwork aesthetic. Larger rugs can be given some extra texture with the help of a smaller throw rug on top, and cold floors can be made cozier with a collage of smaller rugs. Leaving a cozy blanket within reach of all your living room’s major seating also helps keep yourself and your guests warm and cozy during movie nights or holiday dinners.

Be Natural

Signature Design 15602 Living Room

Plants and other natural elements also lend a natural warmth to a living room. Fill your corners with shade-loving plants that don’t mind a few days of cloudy skies. The leafier the better! Filling your home with plants doesn’t just make your home feel cozier, it can also boost your mood and help combat those rainy-day blues that tend to hit hard in the wintertime.

Natural wood furniture is another great way to max out your space’s warmth. A rough-cut wooden table or even some wooden wall art can add to those cozy cottage vibes that make even the chilliest winter bearable. Try keeping some logs in the fireplace too! Even if you don’t use it, the promise of a roaring fire waiting at the hearth is enough to warm anyone up. We have lots of great options from Signature Design by Ashley for sturdy, wooden furniture and décor in our store, so stop in to explore some of the stylish options we have in stock!

The winter winds are no match for your décor skills! With a little help from some new furniture and decorations from Signature Design by Ashley, you’ll be sittin’ cozy in no time. And if you need any help picking out those perfect pieces or imagining a cozier home, you know where to go! Check out our store for some of our favourite furniture and holiday decorating tips from our furniture experts.

Shop Signature Design by Ashley Furniture and Accessories

Alex, Your Furniture Expert

Tips on How to Pick a New Sealy Mattress

Tips on How to Pick a New Sealy Mattress

Mattress shopping is overwhelming. Just stepping into a mattress store can be intimidating enough to make you turn on your heels and book it out of there. But if you’ve been having serious back pain or are unable to sleep well, it may pertinent that you get a new mattress ASAP. So, instead of running out of the next mattress store you visit, take a few of these tips with you on your journey to find the best Sealy mattress for your body.

Budget

It’s never a good idea to go into a mattress shop without a budget in mind. More often than not, you’ll end up choosing the most expensive one in there which can be very disappointing if you end up being unable to afford it.

The best thing to do is to start off with a clear budget in mind. Talk with one of our sales associates about what yours is, and they can show you what options are available in that price range. Price does tend to play a major role in selecting your new mattress, but it’s shouldn’t be the only factor.

Firmness Level

To avoid feeling like you’re looking for a needle in a haystack, begin testing out mattresses based on their firmness level to narrow down your search. To put it simply, mattresses can be categorized into three different levels: plush, medium, and firm. If you aren’t sure which one you prefer, ask your sales associate to guide you to 3 different mattresses that fit into the plush, medium, and firm comfort levels. Once you figure out which firmness level is right for you, start moving around the store and only testing out mattresses that fit that description.

Shop Sealy Mattresses

Innerspring, Memory Foam, or Hybrid Sealy Mattress

Innerspring, Memory Foam, or Hybrid

If you prefer a little bounce in your bed, you may be interested in trying out an innerspring mattress. If you like your mattress to conform to your body more, you’ll most likely be happier with a memory foam mattress. Be sure to test out a hybrid bed that mixes both coils and memory foam so that the characteristics of the two are combined into one bed.

Adjustable Bed Frame

Choosing whether or not you want a Sealy adjustable bed foundation to support your mattress will also be a deciding factor on what kind of mattress you can get. Replacing your current bed frame with an adjustable one can significantly improve your body and help you get a good night’s rest. Speak to our sales associate to learn about all the ways an adjustable bed can position itself to make you sleep like a baby.

Shop Adjustable Bed Frames

Purchasing a new mattress is an investment. It’s something that should last you for the next 10 years, so choosing the absolute best mattress for your body is a big decision. That’s why we’re here to help! Stop into your local mattress store and let us know what you’re looking for in a mattress. We’ll assist you each step of the way until you find the Sealy mattress you’re happy with.

Shop Sealy Mattresses Now

Angela, Your Sleep Expert

Signs of 4 Common Mattress Problems

Signs of 4 Common Mattress Problems

Is there anything worse than a messed-up mattress? Sleeping on a mattress that’s less than perfect can have a range of negative effects on your daily life. From a sore back to daytime fatigue, a bad mattress can take a toll on you around the clock. Luckily, most of the major problems your mattress might face are pretty easy to identify. By keeping an eye out for these telltale signs, you can decide whether your old bed should be fixed or replaced with a new mattress that will never let you down.

Broken Springs

If your mattress has a broken spring, you’ll likely know right away. There will be an uncomfortable spot on your bed, and maybe even a lump sticking you in the side. The bed will also likely squeak and creak when you put weight on it.

Unfortunately, there’s not a good solution for this issue. Few mattresses can be opened up right down to the coils, and trying to swap out a spring will definitely void your mattress’ warranty. Your best bet here is to invest in a new Beautyrest mattress as soon as possible. If you’re dealing with a broken coil, your bed is either old enough that it needs to be replaced, or cheap enough that it wouldn’t be doing your back any favours anyway!

Shop Beautyrest Mattresses

Compressed Foam

If you have a spring mattress, a layer of foam separates the inner coils from the top of your bed. Over time, this foam can compress, leaving you with a hard, lumpy surface. Foam mattresses have a similar problem: uneven weight distribution across the bed can lead to permanent indentations in the mattress surface, making it uncomfortable and unsupportive.
You can try to give a mattress like this new life with a foam topper, or by adjusting your sleep habits to wear your bed down more evenly. A foam topper can give you a few more months with your old mattress, but ultimately, you’ll need a mattress that can give you proper support, and one that’s covered in potholes and speed bumps just won’t do the trick.

Mattress problems - bed bugs

Bed Bugs

Yuck …

Bed bugs have to be one of the greatest fears of any bed owner. They’re gross, they’re invasive, and they make you feel unsafe in what’s supposed to be the comfiest, most relaxing part of your home. Luckily, they’re easy to spot when you know what to look for.

The first thing you’ll likely notice is the bites on your legs and feet. They’re usually small, itchy red welts that appear overnight in straight lines along your skin. If you’ve been waking up with mysterious rashes and bites, you may want to inspect your bed for signs of these nasty little creatures.

An adult bed bug is about the size of an apple seed and can be seen easily with the naked eye. They can usually be found hiding in crevices or dark spots near where a person sleeps, like mattress seams, headboards, bedside tables, and rugs. So, when you begin your hunt, look everywhere. Clusters of shed skins will be a telltale sign of an infestation.

You can get rid of bed bugs, but depending on the size of the infestation, the effort may or may not be worth it. You’ll want to clean all clutter from the area around your bed, washing what you can and thoroughly inspecting what you can’t. Wash all your linens, vacuum the mattress and floor around it, and use a stiff brush to clean the mattress seams.

Whether bed bugs are a problem for you right now or not, you may want to invest in a special mattress cover to treat or prevent a bed bug infestation. Many mattress protectors come with bed bug repelling technology that kicks out these unwanted guests and keeps them from coming back. However, if this all seems like more face time with bed bugs than you need in your life, we would recommend starting fresh with a new Beautyrest mattress. Just be sure none have escaped into your room before bringing in your new bed!

Shop Beautyrest Mattresses

Just Plain Old

If your bed is saggy, lumpy, and leaving you with aching muscles every morning, chances are, it’s just plain old. Most mattresses need to be replaced every seven to 10 years. So, think back, when did you bring home the mattress you’ve been sleeping on every night? Longer ago than you thought, huh? There’s nothing you can really do to revive a mattress past its prime, so say your goodbyes and get excited about the wide world of mattress options ahead of you. Your bed has earned a rest, and so have you — it’s time for an upgrade.

If you’re noticing any of these problems with your old mattress, stop on by to explore your options and get help from the area’s top mattress experts. Don’t settle for a bed that’s not giving you the best you can get! Whether you need mattress protectors, toppers, and other extras to protect the bed you have, or you’re hoping to find a brand new Beautyrest one to make your dreams come true, we’ve got you covered.

Shop Beautyrest Mattresses

Angela, Your Sleep Expert

How to Freeze Your Thanksgiving Favourites

Freezing Thanksgiving Left overs

Well, Thanksgiving is over. The food has been eaten, the dishes are done, the family has all gone, and now all that’s left to do is curl up and take a nap as you … oh wait. There’s one problem.

What. To. Do. With. The. Leftovers.

Sure, you could wait a few hours for your stomach to settle and chow down on them right now. Or you could crack open that freezer and make Thanksgiving last for days to come! Let’s go with that one! Here’s how to freeze your Thanksgiving favourites and have food feasts that last for days or even weeks!

Time for Turkey

It’s great to have turkey leftovers around to reuse – turkey is perfect for sandwiches, a snack, or even to roll up with some cheese and just chomp down on.

When prepping the turkey for your freezer, make sure to separate the bones and the meat – you’ll want to freeze each on their own. And, if you are finding that your freezer just doesn’t have enough room for your turkey, well, then it’s past time for you to get a new one! Stop in today and take a tour of all the large GE freezer and refrigerator combos we have. You are sure to find one that’s just as big as your appetite!

Groovy Gravy

Yes, yes. Gravy can be frozen and you can stretch it out to last as long as possible, even if it does mean that you’ll have to keep pulling out your stretchy pants. If you want to freeze gravy, pour it into an ice cube tray. Now, you’ll have little cubes of gravy you can use whenever you want, on anything you want. You’re welcome.

Saving Stuffing

Freezing turkey stuffing

Stuffing is a Thanksgiving staple. If you want to keep Thanksgiving going for as long as possible, there’s no better way to do it than by keeping stuffing around.

To freeze it, throw stuffing in your favourite sealable, airtight container, and toss that stuffing in the freezer where it will stay good for many, many meals to come. What about after that?
Well, that’s easy. Reheat it in your oven!

Oh, your oven hasn’t been working lately? Or you are unhappy with how it heats food? No problem. We can help with that, too. Let one of our helpful sales associates know what type of oven you are looking for, and they’ll be glad to assist you.

Shop GE ranges

Plentiful Pies

Well, we are going to have to make an exception to the rule for this one. Sure, this blog is about freezing Thanksgiving food to help it last longer, but there’s one problem. Pies just don’t play well with the freezer. It isn’t our fault! At least now you know.

But no matter what you are looking for – a bigger freezer for your Thanksgiving leftovers, an oven to reheat said leftovers, or any other kitchen appliance – we’re always here to help make sure you leave the store as happy as if you’ve just walked away from a Thanksgiving feast.

Whatever we can do to help you on your appliance journey, we will do. So, stop in today. We’re always thankful for your support, and we know you’ll be thankful for the personal care and attention we give all of our customers.

Shop GE Freezers

Amanda, Your Appliance Expert

3 Reasons Why Your Dishwasher Smells and How to Fix It

3 Reasons Why Your Dishwasher Smells and How to Fix It

It’s a tale as old as time: You open your dishwasher to do a load of dishes, and a giant wave of nausea sweeps over you as an unbridled, nasty reek pummels your nostrils into sadness and submission.

Yup. Something is definitely, totally, 100 percent wrong. The good news is that there is a solution to your problem. Several, in fact! First, let’s try to figure out what is causing that smell and get to the root of the problem.

Trapped in the Filter

The first thing you want to check when your dishwasher smells worse than two-month-old roadkill that’s been baking in the hot sun like an omelette of death and disease is the washer’s filter/trap. When was the last time you cleaned your filter? Have you ever even looked at the filter? Did you even know that your dishwasher had a filter? Well, now you do. You’re welcome.

We aren’t here to judge! Just to help. Clean that sucker out, and see if that helps the smell problem at all. If not, keep reading. We’ll get to the bottom of that smell even if it kills our noses first.

Shop Whirlpool Dishwashers

A Home for Mould

Remember when we said we weren’t here to judge? We really mean it. We’re just trying to help you keep your appliances in the best shape possible. We want your stuff to last as long as it can.

With that in mind, we do have one small little question: How often do you do dishes? This is a totally judgement-free zone, so be honest. If the answer is “Not that often,” then that could be part of the problem.

If you leave your dishwasher closed for long periods of time, it creates an environment for mould to take over. There are a few ways to avoid this: You can wash dishes more often – you even save water by washing them in a dishwasher versus washing them by hand! – or you can make sure to leave your dishwasher open just a crack to let it air and dry out.

Of course, if The Rot has already taken hold, you may need to give it a deep cleaning, as well.

What Lies Below

Despite the best-laid plans of mice and men, it is possible that your washer’s odour issue is not because of something you did. It could be a problem that was out of your own hands.

If you’ve cleaned and scrubbed and rub-a-dub-dubbed and your dishwasher still smell, then you might want to check underneath and behind the dishwasher. Be primed for the worst, however: It’s possible that a rodent died underneath it and is the source of all your problems. Sob.

Of course, these are only a few possible reasons why your dishwasher may have turned into a party for scents and rodents. Maybe your dishwasher is too far gone, and there is no turning back from the dark and dingy road your neglect has set your dishwasher upon. If that’s the case, there is only one solution that will work: Buying a new one.

That doesn’t have to be a painful solution, though. Come on down to our store, we’ll help you find the Whirlpool dishwasher that will best suit your needs. Just, please, try to clean and care for this one more often!

Shop Whirlpool Dishwashers

Amanda, Your Appliance Expert

Your Guide to Mix ‘n Match Metals in Home Décor

Your Guide to Mix ‘n Match Metals in Home Décor
Source: The Designory

Mixing metal finishes continues to be a popular trend in home décor. From furniture to lighting fixtures, all types of metals whether it be copper, gold, brass, silver or black iron work together. While we encourage you to be bold in your design, when it comes to mixing different metals finishes there is definitely such a thing as ‘too much’.

With that in mind, we’ve pulled together our best tips (basic guidelines if you will) to help you mix n’ match your metals with ease.

Step 1: Pick Your Dominant Metal Finish

The prima ballerina never shares the spotlight and that should be the same in your home. Pick a hero finish, it could be the incredible brass chandelier in the dining room or the giant gold mirror in your bathroom. Once you have your principal dancer you can carefully select the backup dancers.

Step 2: Pick Your Secondary Metal Finish

Just like Janet Jackson, we want to be picky about our back up dancers because they can inadvertently take attention away – not something any star wants. You want to select one or maybe two back up finishes to complement your star. Do the finishes work together? Do they complement and help draw your eye around the room? In smaller rooms, it is always best to stick with just one or two finishes. In larger rooms, where you can spread finishes out, you can add in a third. For example, beautiful black iron curtain rods in a living room with a brass coffee table and small silver accents throughout the room.

Metal finishes mixed from Renwil

Step 3: Go Big and Go Small with Layers and Textures

A great opportunity when mixing metals while decorating is to mix the sizes up. Big items like large lamps or tables combine with subtle but beautiful details like small brass handles on a table, or the frame on a photo. Don’t be afraid to layer the sizing and finishes, this adds dimension. Textures too add an element of sophistication. If all your metals are flat it will fall flat on the eye. Try adding in textured details like the framing on a mirror or photo frame to a solid metal like a table lamp.

Tip: Adding metal trim to furniture creates a timeless look.

Step 4: Let Inspiration Guide You

Not quite sure what you want your hero to be or what finishes you love? Shop our home accents and décor to see what’s in store. Or jump on your favourite home décor site or Pinterest for a look at what others are doing and what’s trending.

Mixed metals in interior design is a trend we don’t see stopping. It creates a timeless look and adds a touch of sophistication to your home. From a show stopping hero item to small touches like a collection of small brass birds on your bookshelf, mixing metals is a great way to show off your unique style.

Want more tips and inspiration for your home? Check out our Inspiration blog.

Rebecca, Your Furniture Expert