Gas vs. Electric. vs. Induction. Let the Battle of the Cooktops Begin!

Gas vs. Electric. vs. Induction. Let the Battle of the Cooktops Begin!

When it comes to cooking, there are three things you need to know about. Gas. Electric. Induction. Those are the three fuel options on the market for your range or cooktop with each having their own benefits and drawbacks. So, how do you know which cooktop fuel type is right for you?

When it comes to fuel, most people tend to go with what they already know, but as technology evolves it’s worth exploring your options. Even beyond innovation, there are plenty of aesthetic reasons to make a change. As you’ll see, not all fuels are created equal.

Now that you’re warmed up, let’s take a look at what you can expect.
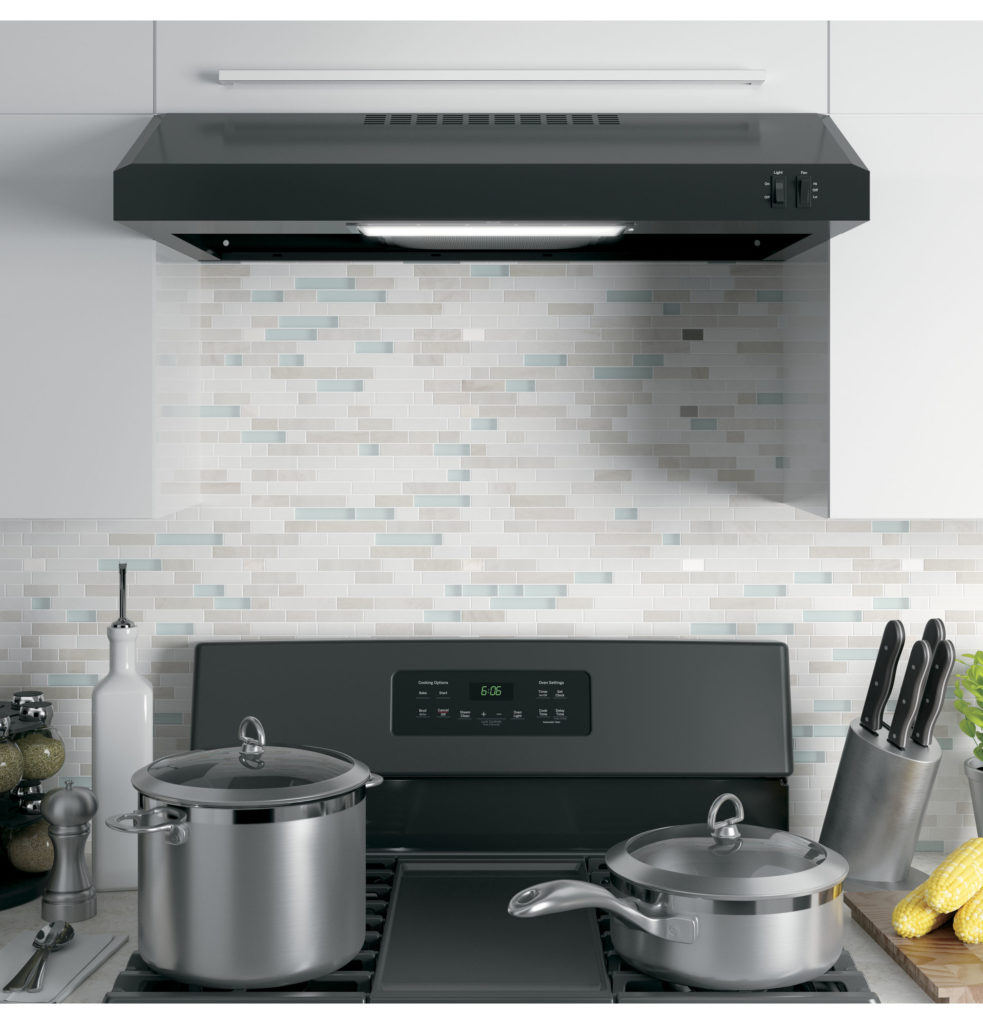
Cooking With Gas

Gas Cooktop

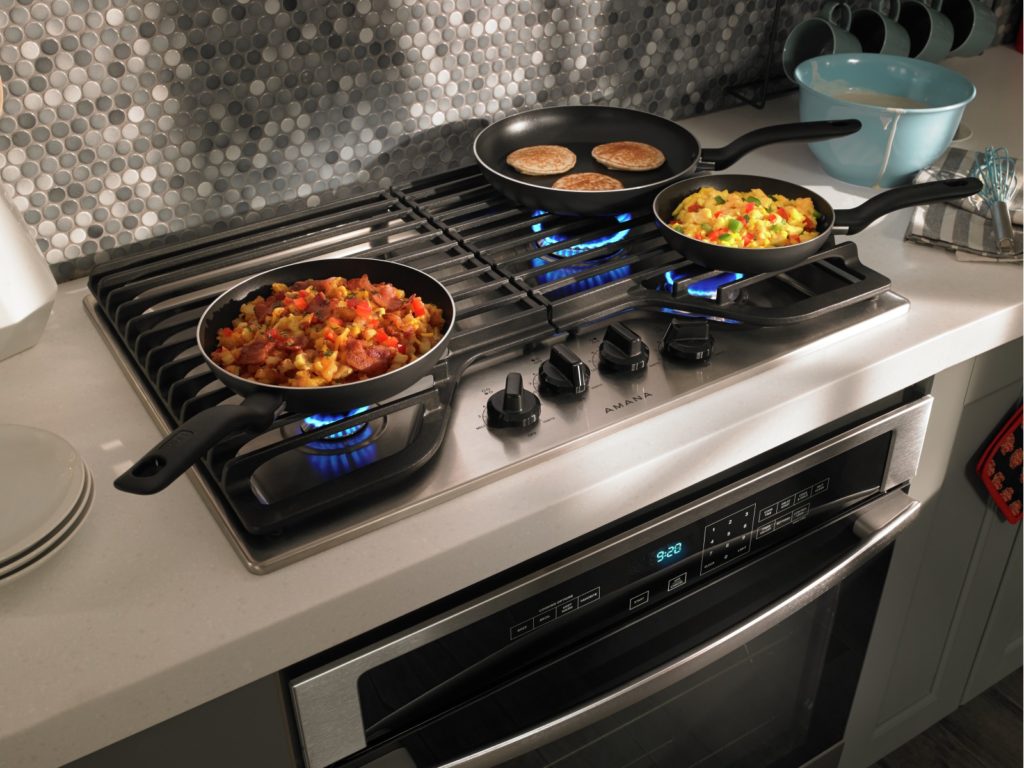
Gas cooktops are most popular with serious cooks. From culinary professionals to home cooking wizards, the magic of gas is in that little flame. Compared to electric cooktops, gas offers more precision within a greater temperature range. For many people, the live flame is also more intuitive and easier to control.

Available in natural gas or liquid propane, gas cooktops are more energy-efficient than radiant electric models. From a design point of view the live flame, heavy grates, and commercial appearance remain as popular as ever.

If you like tactile control with a professional look and performance and you aren’t intimidated by a live flame, then a gas cooktop could be for you.

Electric Radiates Warmth

Electric Ceramic Cooktop

Electric cooktops come in two options; coil top or smooth top. Coil tops are the old-fashioned ones. Rings of conductive metal mounted into the cooktop, and to cook you simply place your pots and pans directly onto the ring. Very durable, easy to clean and self-repair, coil tops are the most affordable cooktops on the market.

Stepping up into a ceramic glass cooktop will offer better performance and more features. With an electric coil, or halogen lamp set beneath the glass, heat is more evenly distributed. The glass top gives you an easy to clean surface and an integrated look that will bring out the best in any kitchen.

If you want an integrated, elegant and relatively inexpensive cooking option, then an electric cooktop could be the way to go.

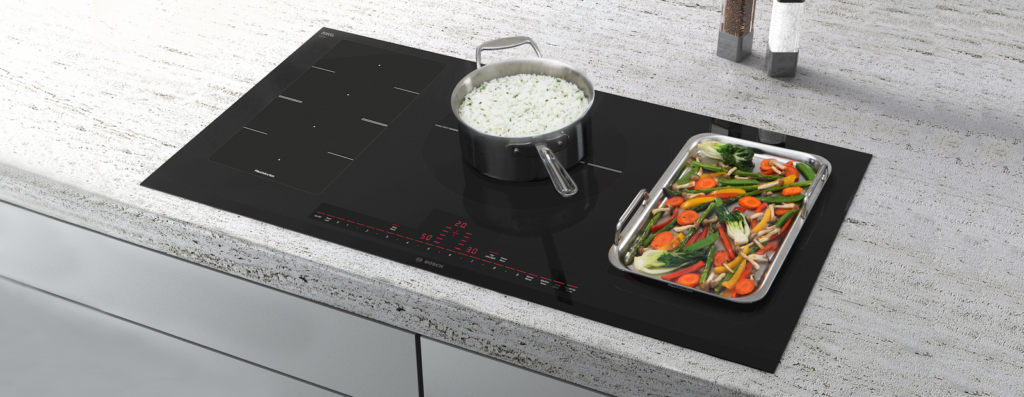
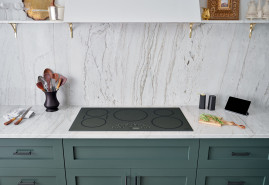
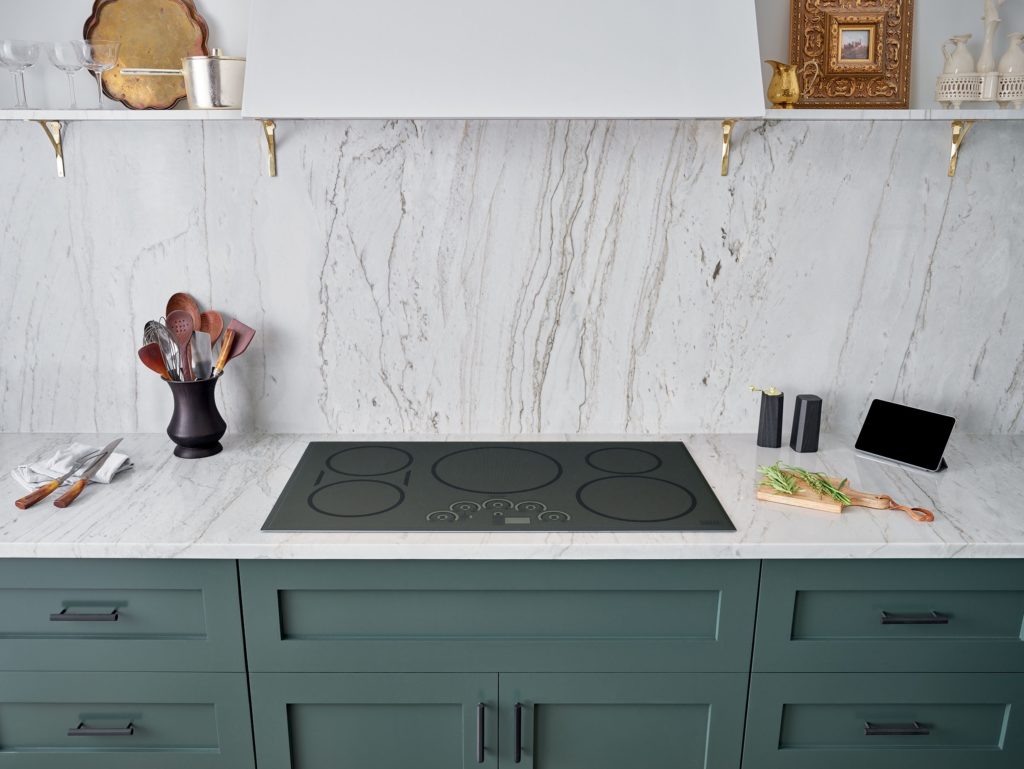
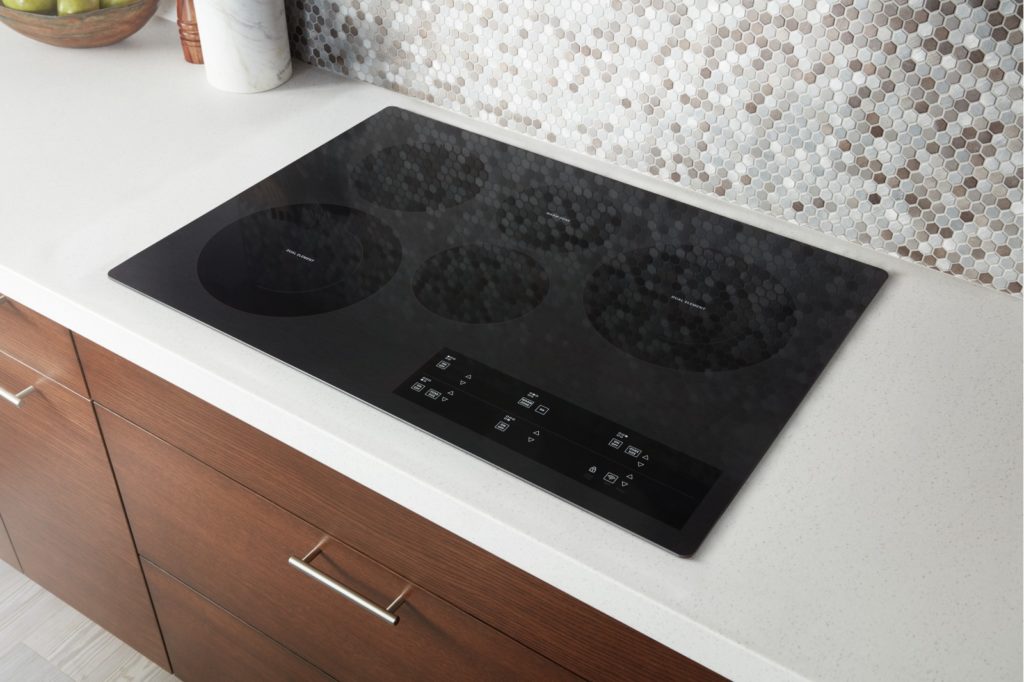
Why Is Induction Cooking So Attractive?

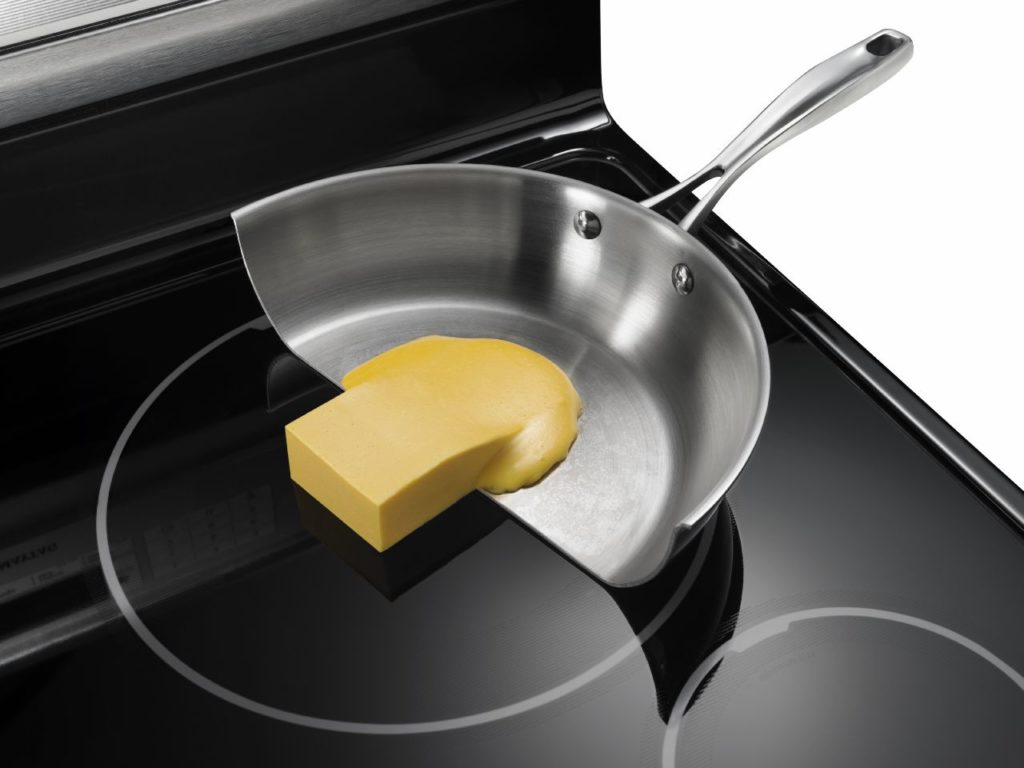
Induction cooktops may look like electric cooktops, but that’s where the similarity ends. With induction cooktops, magnetic coils are set beneath the glass. When a ferrous metal pot or pan (a magnet will adhere to the pot) is placed on the cooking surface, an electromagnetic field is created which heats the cookware.

Not only is this direct heat incredibly efficient (like boil water in 90 seconds efficient), it’s also the safest and the most precise compared to both electric and gas options. If that wasn’t enough, because the cooking surface doesn’t actually heat up, it’s also the safest and the easiest to clean. When it comes to cooktop performance, induction cooktops really do offer the best of both worlds.

As a newer technology, expect to pay more for induction cooktops. You may also need to invest in new cookware (cookware that will attract a magnet). And when it comes to installation, remember that induction cooktops require anywhere from 40 – 60 amps depending on the model, compared to only 30 – 40 amps for a traditional electric cooktop installation.

If you want the most precise, efficient, and safest option on the market, and you can afford to pay a little bit more for that extra performance, then there has never been a better time to buy a new induction cooktop.

Now that you’ve got a taste of what you’re cooking with, head over to our Appliance Buying Guides for all the information you need on cooktops and ventilation.

Shop our selection of cooktops now!

Isabelle, Your Appliance Expert

5 Questions to Ask When Buying a New Dishwasher

5 Questions to Ask When Buying a New Dishwasher

If you’re reading this, it probably means you’re looking for a new dishwasher. It’s hard to imagine life without a dishwasher. I mean, you could. It’s possible to wash all your dishes by hand… but really? Come on.

You’ve probably noticed that there are a ton of features on the market. Laser beams that shoot out of the dishwasher and onto your floor are super cool, but if you’re serious about buying a dishwasher then you need to ask yourself a few questions.

Seriously, this is Dishwasher 101.

Is It Quiet?

Everyone looking for a dishwasher wants it to be quiet. It’s the number one most requested feature, right up there with actually cleaning the dishes. With every manufacturer promising quieter and quieter machines, how can you know which one is the quietest?

Honestly, you can’t. Not really.

There’s no standard when it comes to measuring a dishwasher’s decibel rating, but there are certain rules of thumb you can count on when you’re buying a dishwasher.

  • Stainless steel tubs are quieter than plastic or hybrid tubs.
  • Lower advertised decibel (db) ratings will generally be quieter, but since most people can’t differentiate between 3 db anyway, don’t stress this too much.
  • Some of the best dishwashers on the market are also some of the quietest, so leaning into this feature is a good shortcut when you’re shopping for a dishwasher.

What Is The Tub Made Of?

Dishwashers have 3 types of tubs: plastic, stainless steel, and a mix of both (hybrid).

When looking at dishwashers just remember that plastic tubs will be the most cost effective, and resist stains best. Stainless steel is the most durable, the quietest, the most energy-efficient and the most odour resistant. Hybrid tubs, combine both materials offering the benefits of both, but also some of the downsides too.

For more detail on dishwasher tubs, check out our previous article Which is Better? Plastic, Stainless Steel or Hybrid Dishwasher Tub?

Does it Have Load Flexibility?

Dishwasher with cutlery trays

In the olden days, you crammed your oversized dishes between the fixed prongs and if they didn’t snap off, you prayed the plates would clear the racks. Then when it inevitably failed, you took those dishes back out of the dishwasher and cleaned them by hand. Luckily, we don’t live in the dark ages anymore.

Today’s dishwashers have many load flexible options to make washing every type of dish easier than it’s ever been. How you load the dishwasher is going to affect how well it cleans too. And more flexibility helps there as well.

Look for options like cutlery trays, collapsing tines, and adjustable racks. Dedicated wash zones, more powerful jets and specialized nozzles help tackle stubborn soil loads and all combine to make every dish sparkle.

Is It Energy-Efficient?

You may not have heard, but cleaning a load of dishes in a full dishwasher uses less water than washing your dishes by hand. Not only are energy-efficient dishwashers better than hand washing, they’re also better than they’ve ever been. Today’s dishwashers use less energy and less water than last generation’s comparable models.

Features such as heat transfer technology reduce the need for high output warming coils. Soil and load sensors waste less water. Couple that with better filtration and more efficient detergent and you really minimize your ecological impact. And of course, saving energy helps you save money too.

If environment-friendly tops your must-have features then head over to Energy Star’s Certified Dishwasher list to find the most eco-friendly models.

How Does a Dishwasher Deal With Food Waste?

Dishwasher Filter

Dishwashers deal with food one of two ways; they filter it, or they grind and flush it.

Most European dishwashers feature a manual filter at the bottom of the tub, just beneath the spray arm. Heat is used to dissolve most food waste, and any leftover is trapped by the filtration system. A manual filter is easy to clean, quieter and the most energy-efficient option.

Many North American dishwashers still use some kind of hard food disposal system like a grinder to break up excess food particles and flush them down the drain. Automatic disposals are definitely neater and tidier than having to clean a dirty filter although they can also lead to more service issues.

With those five questions answered you’re off to a great start! Our Dishwasher Buying Guide has everything you need to find the perfect dishwasher. You can also check out a couple of our helpful blogs for even more information.

Isabelle, Your Appliance Expert

Cook Anywhere with a Bosch Flexinduction Cooktop

Bosch Flexinduction Cooktop

The best things in life are flexible: Gum, Slinkys, and even those stretchy pants you make sure to wear every Thanksgiving.

With their new cooktops, Bosch is bringing that same level of flexibility to your kitchen. And, with the added power of induction, Bosch is introducing a Flex-volution to cooking as you know it. Here are just a few of the reasons that FlexInduction Cooktops will help you cook any way – and anywhere — you want.

Bigger is Better

If you’ve got a big meal to prepare for the in-laws, or just have a lot of mouths to feed every night, cooking can be a time-consuming and crowded affair. With all those pots and pans – and “NO ROBBIE PUT THAT DOWN THAT ISN’T DONE COOKING YET!”– and well, you only have two hands, and only so much cooktop space, it’s an underappreciated miracle that dinner gets done at all sometimes.

Bosch has heard your dinnertime cries. FlexInduction cooktops can get your cooking done quicker than your kids will be able to destroy the house or mess up the kitchen. With FlexInduction, your cooktop’s two cooking zones can be used together to allow for the use of larger cookware. One massive cooking zone, all ready for everything you – and your family – can throw at it.

Faster is Better

Patience may be a virtue, but that doesn’t mean it’s one that most people practise often. Don’t worry, Bosch has a solution for you there, too. With the SpeedBoost function, you’ll be boiling water twice as fast.

Mac and cheese? Pasta? Corn on the cob? All of those family staples just got faster to cook, which means you have more time to spend actually eating dinner with your family instead of just wasting away over the stove all evening.

Power is Better

Imagine having all the power in the universe. Imagine being able to snap your finger and the rules of space, time, and energy all bend to your will.

So, this might not be quite that powerful, but it’s probably the next best thing. Bosch’s PowerMove feature divides your FlexInduction into three different areas. Each area has a different preset power level, and all you have to do is move whatever you are cooking to change levels. It’s easy as pie! Except you probably shouldn’t cook pie on a cooktop. But you get the general idea.

Everything is Better

In case you aren’t already convinced at just how awesome Bosch cooktops are, there’s one more stop left on this train ride. Bosch cooktops also feature a wide array of other features, including child locks, SafeStart that makes sure other metal objects aside from cookware don’t start the element, and even settings perfect for melting chocolate or butter. Bravo, Bosch. You really have thought of everything.

Even better, if you are looking for a new Bosch cooktop – or just can’t decide which of their cooktops would fit best in your kitchen space and needs – stop in today, and we can answer any and all of your questions. We promise to get you back cooking in your kitchen again before your kids will even notice you are missing. Or at least before they cause too much trouble.

Shop Bosch Induction Cooktops here.

Amanda, Your Appliance Expert

How to Clean the 4 Parts of Your Samsung Range that Get the Dirtiest

How to clean a range

If we’re being honest here, kitchens are icky places. Don’t get us wrong, they have the ability to be rather clean and germ-free, but if you continue cleaning them the way you are, you’ll never get away from the constantly growing bacteria living in the crevices of your appliances.

If there’s one appliance that seems to do a lot of the work in your kitchen, it’s the range. From spills to grease splatters, this major appliance tends to get the most use and the most messes.

But, instead of just focusing on the obvious cleanups, we want to help you really sanitize the scum out, which means doing more than just spraying a simple solution inside your range oven and wiping it down.

It requires a little more detail work. Follow these steps to clean the most surprisingly dirty spots of your Samsung range, so your kitchen stays a hygienic place for cooking food.

1. Get a Handle on It

If you are someone who tends to wash doorknobs and drawer pulls, we probably don’t need to lecture you about washing your range oven handle. But it’s better to be safe than sorry! Can you count the number of times you’ve opened your Samsung range oven when your hands were covered in food? It’s not at the top of most people’s priority list to wash our hands before opening the oven, but maybe it should be.

Door handles tend to harbour more harmful germs than most surfaces and if not washed off correctly, will create bacteria colonies! In any case, taking the time to at least clean off your oven’s handle after a meal will save you from spreading germs to other family members who also like to cook.

2. Rack On

The racks inside your Samsung range oven may get immersed in an intense amount of heat, but that in no way means they are sanitized. Every month or so, fill your sink with hot water and soap and let your racks soak in them for 30 minutes to an hour. If your sink is too small to fit them, find an empty bin to fill with hot water and soap.

Once they are done soaking, the grime should just wipe off with a washcloth. Just like butter.

3. Grate Expectations

Cleaning gas cooktop

Just like the racks in your range’s oven, if you have a gas cooktop, the grates will need some loving to keep them from bacteria’s reach. Lifting them up and cleaning under and around will not fix the issue – they may need a good soaking as well. Follow step 2, but for your cooktop’s grates, and that will clear up most of the germs you’re trying to rid yourself of.

4. A Land Down Under

Underneath your range is like a scary abyss. It’s a place where all the escaped leftovers go to die and attract other unwelcome things. This is exactly why you must look under your appliance and wipe everything up. We suggest either pulling your range all the way out so you can clean it, or using a duster that is thin enough to go under your range and wipe away the debris. It may seem spooky under there, but just remember, it’s more afraid of you than you are if it.

Of course, some ranges are beyond help, and you may just need to get a new one. If you’re in the market for a new range, be sure to check out the Samsung range selection we’ve got going at our store! And once you have it, help it stay in good condition by cleaning it EVERYWHERE. That way it will be fresh, clean, and ready to take on your food endeavours while keeping you safe from harm’s way.

Amanda, Your Appliance Expert

How to Motivate Yourself to Do Laundry

How to Motivate Yourself to Do Laundry

Let’s face it: Most people really don’t like doing laundry. But, along with dishes, mowing the lawn, and changing baby diapers, laundry is just one of those chores that has to get done, even if nobody in particular wants to do it.

And, the larger your family grows, the more laundry starts to – literally – pile up. If you are struggling with the lifetime laundry blues and are looking for help, here are some ways to put yourself back on track toward freshly washed clothes.

Make It Fun

One of the easiest ways to try to get yourself to do laundry is through association. If you associate something fun with doing laundry, then maybe you won’t put it off until you are stuck wearing the same underwear three days in a row and hoping you don’t smell.

For example, you could put on one of your favourite albums, grab your favourite beer, cocktail, or glass of wine, or even turn it into a competition between the kids to see who can do the most laundry and reward them with some ice cream, accordingly. Of course, you could always reward yourself, as well, so let’s look at idea number 2…

Reward Yourself

Treat yourself! As much as we might like to pretend that we are super evolved creatures, humans really operate on a pretty standard reward system. Much like dogs and treats, positive feedback and reinforcement go a long way, and you can turn that to your advantage to make yourself do laundry.

If you put off that thing you really want to do until you get the laundry done and then reward yourself, you’ll be more likely to keep that laundry pile small and manageable. There are plenty of possibilities: giving yourself a sticker that goes on your fridge, letting yourself stay up a bit late to watch an extra episode of your favourite Netflix show, or getting to take a nice, warm bath with a new book.

How to Motivate Yourself to Do Laundry

Wear Your Favourite Outfits First

If you are still struggling with life, liberty, and the pursuit of clean laundry, keep reading. Another trick that might work is wearing all your favourite outfits first. This way, eventually you’ll be just down to outfits you really don’t like – or no outfits at all – which will put you in the position of either finally breaking down and doing laundry or wearing your 7th grade cheerleader outfit to your aunt’s wake. Please, for the sake of your family, pick doing laundry.

Pile Your Clothes Somewhere Important

Desperate laundry times call for desperate laundry measures. If you still can’t muster up the courage to face the daunting laundry task, then maybe you need to take some extreme action.

For example, you could pile all your dirty clothes on top of – or in front of – something that you really enjoy, so that they’ll deter you from being able to use it. For some, that might mean piling all of your dirty clothes up on the TV, for others it may mean covering up your favourite chair.

Sure, it’s a little mean and messy, but if you really want to binge-watch “Gilmore Girls” for seven hours, you’ll need to get up, move that pile of clothes, and wash them.

We’ll also add that putting your clothes someplace only slightly annoying might not have the desired effect here. If you just throw them in a chair that you don’t use that often or hide them in a corner, you’ll probably just end up moving them back and forth until the pile becomes a giant, unwieldy gargantuan laundry monster that one day becomes sentient and eats you. And you don’t want that!

Of course, another way to make laundry fun is to get a new Whirlpool laundry pair – one that perfectly matches your laundry habits and has new bells and whistles to make washing and drying even easier. Stop in today to see what a new washing machine and drying machine from Whirlpool can do for you, and get out there and get washing!

Amanda, Your Appliance Expert

The Basics of Installing a GE Range Hood

The Basics of Installing a GE Range Hood

A range hood is one of the most important appliances to have in your kitchen. It is a large appliance that either re-circulates fresh, filtered air back into the kitchen or vents smoke, heat, and odours outside to keep them from getting in your way while you cook. A high-quality GE range hood is a must-have for any cooking enthusiast, but if your home doesn’t come with one built in — or if your old one is worn out — installing a new GE hood can seem like a daunting task.

However, it only takes a few simple tools and some know-how to install a GE range hood in your kitchen. They come in a variety of sizes, strengths, and configurations, so you’ll need to check the manufacturer’s guide for precise instructions, but these basic guidelines will help you on your way to getting your kitchen cooking-ready.

Range Hood Installation Basics

  1. Pick out the right range hood. Your choice will depend on how much you cook and how your kitchen is set up. If you have a clear space above your range, you can use more sophisticated chimney, island, or wall mount hoods, but if your stove is directly under cabinets, you’ll have to opt for an undercabinet hood. Undercabinet hoods tend to be easier to install since many of them don’t require a duct leading outside the house, but be aware that models which recirculate air rather than venting it may not be as effective.
  2. Take safety precautions. Turn off the power to your kitchen and lock the panel box to make sure no one turns the electricity back on until you’re done. Be sure to wear goggles, gloves, and a mask while you work.
  3. Check your venting. If you want to install a vented hood, make sure you have the proper ductwork and a range hood that matches it. Undercabinet hoods typically have ducting either running up through the cabinets above, or back through the wall behind it. If you’re installing new venting for your GE range hood, be sure that it doesn’t end in the attic or against a wall. All vents should lead outside the house, to avoid heat buildup and potential fire hazards.
  4. Remove your old hood, if you have one. After shutting off the power, open up the panel covering the electrical wiring on your old hood and disconnect all the wires. If you have an undercabinet hood, loosen the screws that attach it to the cabinet above, but don’t remove them completely. You should be able to slide the hood off the screws. Once you’ve set the old hood aside, remove the screws from the cabinet.
  5. Make sure the new hood fits correctly. Depending on the type of hood and range, the new hood should be about 20 to 30 inches above the surface of the cooktop. Hoods can hang slightly lower over electric stoves as compared to gas-powered. For optimal results, make sure the range hood covers the whole cooking area, with a 3-inch overhang on all sides, if possible.
  6. Reconnect your new GE range hood. In all instances, be sure to read and follow the manufacture’s installation instructions. Hold the new hood in place and thread the wires from the wall through a small hole in the back of the hood. There should be one black and one white wire coming from the wall, as well as two black wires and two white wires coming from the hood. Connect the two black wires from your hood to the black wire on the wall, and the two white wires from your hood to the white wire on the wall using wire connectors. Tuck the wires away, replace the panel cover, then screw the hood in place using the type of screws recommended by the manufacturer. Turn your power back on and test it out to make sure your new range hood is fully functional.

Shop our GE range hoods here

Amanda, Your Appliance Expert

6 Unique Kitchen Storage Ideas

6 Unique Kitchen Storage Ideas

Kitchens can easily become a mess. Between cooking, eating, cleaning, and storing, they have their work cut out for them. Balancing all of that along with work and the kids and – and oh, look, there the dog goes eating something off the counter again – can be a chore for even the most talented of homemakers.

The best bet is to try to get ahead of the battle by having storage solutions for everything that lives in the kitchen. By having places for everything, you’ll know where to return stuff when you are done with it, instead of just leaving it behind to take up precious counter space. And after putting in all the work to organize everything and seeing your kitchen in its cleanest glory, it’s likely you’ll want to keep it that way.

The needs of every kitchen are different, but we put together some ideas to help make the best use of the space you have and to organize your kitchen your own way.

1. Use Those Walls

Sure, they are there to keep your ceiling up, but walls can be used for plenty of other things, as well!

You could wall mount a plate rack or grab some wall hangers and use that space for pots and pans. It will help give you more room in those cluttered cabinets to move some of the bigger and bulkier items out of the drawers and on to the walls.

2. Mug Shots

Hanging mugs

Coffee – or tea, for you fancy folk out there – mugs can take up a lot of space, especially as you start to collect cool ones you find. Not only that, but they often aren’t easily stacked, with different ones coming in different sizes and shapes.

What to do with all of them, then? Display them! You could go with a mug rack with hanging hooks, dedicate a whole wall of your kitchen to a mug display, or use some under-cabinet hooks to really maximize your mug space. The more mugs the better, we always say!

3. Merry-go-round

Some kitchens just have awkward corners that don’t seem to help much when it comes to storage. That’s not always true, though! Corners can be just as useful as shelves or cabinets for storing your kitchenware.

How, you might ask? Turn that corner into a carousel! Grab a carousel rack and turn that once-neglected corner into a master of organized cabinetry. And one that’s fun to spin around, of course.

4. Knifing Around


Source: DeVos Custom Woodworking

Looking for a cool and unique way to display your kitchen knives? Tryout an in-counter knife slot. We wouldn’t recommend trying to put one in yourself, but it gives you an option to do something a little more colourful with your cutlery.

5. Spices

Life without spice just wouldn’t be life, now, would it? Perfect for adding that extra little bit of pizzazz to whatever it is you are cooking, spices can also tend to accumulate and take over the kitchen.

Fret not: There’s no need to contribute to waste by throwing them away, you just need a more organized and seasoned approach. Spice racks are a good way to do this, and they make racks of all shapes and sizes that can go almost anywhere in your kitchen.

6. Don’t Wine

Danby Wine Cooler

Wine bottles – while an important part of any kitchen – can also quickly take up counter space. Try throwing a little artistic direction into your alcohol storage! Wine racks are always one way to go, but the internet is full of unique and creative solutions for wine lovers of all kinds.

Another great way to store your wine bottles is to use a Danby wine cooler. Since most refrigerators are set too cold for wine, a wine cooler will help maintain the integrity of the wine by generating a consistent temperature control. You paid good money for that wine, after all, so you might as well make sure it is well-preserved too!

Need more ideas? Come visit us and talk to one of our expert sales associates on how to create your most organized kitchen to date. They’ll walk you through our Danby wine cooler collection and other new appliance features that will help you get more organized.

Shop our Danby wine coolers now.

Amanda, Your Appliance Expert

4 Ways to Take Care of Your New Sealy Mattress

4 Ways to Take Care of Your New Sealy Mattress

If you want a mattress that’ll last a long time, you’re going to need to take care of it properly. While most mattresses should last about 10 years, we want you to get the most out of your Sealy Mattress so that it could last even longer. Read through these helpful tips that will keep your bed in good shape and continue to lengthen the longevity of its life.

1. Mattress Protector

Get yourself a mattress protector and your Sealy mattress will have much better luck surviving the test of time than without one. The common myth about mattress protectors is that they feel like sandpaper – making sleep very uncomfortable.

Mattress protectors are fortunately not rough and just feel like thick sheets. They protect the mattress from bed bugs, dust mites, spills, sweat, and allergens while still continuing to be breathable on your skin. And just like normal bed sheets, your mattress protector needs to be washed. It absorbs a lot and should be thrown in the washer monthly.

Learn more about mattress protector types and the necessity to use them.

2. Support

A bed with a bad support system starts sagging over time and a saggy bed is detrimental to the body. You’ll need a foundation to keep it sturdy and prevent the sagging process from occurring. You could use something as simple as a box spring or something more advanced like a Sealy adjustable bed base to do the job. The choice is yours.

3. Rotate

Beds these days usually need a rotation instead of a flip because most are not double-sided anymore. If you spin your mattress a couple times a year, the bed will wear evenly. Depending on the bed, this may not be required. Speak with a sales associate at your local Sealy Mattress store to see if you should do that for the bed you’re interested in.

Learn more about mattress flipping.

4. Don’t Sit on the Edge

Every morning when putting on your shoes, do you sit on the edge of your bed to do it? While this seems harmless, unfortunately, your bed can start to lose structure in the parts you sit in most often. Save your bed the problems and find a chair to use every morning.

Buying a Sealy mattress is a big investment! Keep yours in pristine shape so it sticks around awhile.

Angela, Your Sleep Expert

Sleeping Tips for a Stomach Snoozer

Sleeping Tips for a Stomach Snoozer

Sleep can either be serenity or stress. If you fall asleep easily, sleep is a wonderful journey through stars and clouds and floating sheep and peaceful skies.

But, if you struggle getting to sleep, it can be the opposite. And for those of us who sleep on our stomachs, trying to sleep in other positions can put even more pressure on the whole falling to sleep situation. Especially with continually hearing from people how bad it is for your body.

That’s not what we’re here for. We get that stomach sleeping can be unhealthy, but we want to help you get to sleep how you want to get to sleep. That’s why I put together these tips for stomach sleepers: not to try to get you to fall asleep in another position, but to help you fall asleep on your stomach in the best way possible. Now, let’s get dreaming together.

Lose the Pillow

Sleeping on your stomach can cause neck issues, especially if you have a super thick pillow. To help your neck as much as possible, try to use a thin pillow. Even better yet, try sleeping with no pillow at all! This may seem counterintuitive to everything you were taught at sleep school, but that’s actually the best thing you can do for your neck if you tend to faceplant into your mattress.

Remembering to Stretch

Do you make sure to do your daily exercises? No? Well, if you are going to commit to sleeping on your stomach, you should repay your body by doing it some favours.

I know it can be a hassle to add anything else to your already packed morning routine, but you should also throw in some morning stretching — it will help realign your body after a night of stomach sleeping.

Benefits of stretching in bed

Maximizing Your Mattress

There’s another key factor in the “you+sleep = happiness” equation, and that, of course, is your mattress. Because you are a stomach sleeper, you may need a more supportive and firm mattress. If you feel like you aren’t getting what you need from your mattress, then it might be time to look into getting a new one. We’re always glad to help you find one that will perfectly fit your sleeping needs – so stop by and try out our wide selection of Beautyrest mattresses!

Pelvis Positioning

OK, sure, I just told you to get rid of your pillow. But I didn’t mean that you should throw it out! There’s actually something you can use it for that can help: Instead of using it to rest your head, you should sleep with it under your pelvis. This will help your back and spine, and you kind of need both of those in the long haul.

If you’ve tried all these tips and still are having problems, perhaps it isn’t how you sleep that’s the problem. Instead, the problem could lie with your mattress. Give us a call today: We are always here to help you find a Beautyrest mattress that will safely set you adrift on the shores of sleep!

Shop our Beautyrest Mattress now!

Angela, Your Sleep Expert

How to Pick the Right Signature Design Seating for Your Living Room

How to Pick the Right Signature Design Seating for Your Living Room

No matter if you or your family are watching movies, playing video games, reading your favourite novellas, or binging the latest season of “This is Us,” you don’t want your leisure time in your living room interrupted by uncomfortable cushions or hard-as-asphalt seating.

As your family grows, your seating needs are going to change as well. We’re here to guide you through the process of picking out Signature Design living room seating, and to help you decide which is best for your unique scenario.

Size and Spacing

If you are living by yourself in a smaller apartment, your living room seating needs are going to be much, much different than a family of four with a spacious living room and kids bouncing off the walls.

The first thing you want to consider when it comes time to think about your backside’s needs is space. If you don’t have a lot of space you may want to opt for smaller living room furniture, and if you live alone you might be able to get by with a one-person recliner or smaller loveseat – of course with optional folding chairs or storable seats for when you have company over.

If you have to consider the seating needs of your whole family, though, you want to make sure to get something that can seat everybody comfortably. Larger Signature Design by Ashley sectionals can be a better option here and can give everybody room to sit comfortably all at the same time.

Selecting your living room furniture

Cushioned Comfort

What’s one of the worst things that can happen when it comes to shopping for new living room furniture? Picking out something you love, getting it home, then testing out your seat … only to find out that the piece you were in love with in the store isn’t nearly as comfortable at home.

The easiest way to combat this is to make sure that you try out any furniture before bringing it home. Give it a test spin. Recline. Sit. Get comfy. And most of all, make sure you’re actually enjoying sitting on it.

Do Your Door Diligence

OK, there’s one thing that’s worse than getting home with your new furniture and finding out that it isn’t that comfortable: Getting your new furniture home and finding out that it won’t fit in your home.
Before you bring any piece of furniture home, no matter how big or small, you want to measure any doorways the furniture will have to travel through and make sure that it is going to fit.

You also want to make sure that it will fit in your vehicle – been there, tried to squeeze that. Of course, if you’d rather not worry about transportation about all, give us a call! We’ll deliver anything you buy from us, making your path from purchasing to reclining easier than ever.

It’s always important to think before you shop, especially when you are making purchases as important as living room furniture. Really study your needs and talk to your family and figure out what will work best before bringing any purchase home.

Also, don’t forget that delivery isn’t our only specialty! We’re here to help you through the entire shopping process. Our knowledgeable experts will help you from the moment you walk in our store until your new favourite Signature Design by Ashley furniture reaches your door, so stop in today and see what it’s like to shop for furniture the easy way!

Shop our Signature Design by Ashley living room furniture now!

Alex, Your Furniture Expert