How to Mix and Match Dining Room Chairs

How to Mix and Match Dining Room Chairs

Source: CC Construction Ltd

A room refresh can brighten your mood and encourage you to use the space more often. And let’s face it, we should all gather around the table and enjoy a meal together more. So in that spirit, we’re here with some fresh inspiration with a dining room décor idea: how to mix and match your dining room chairs. Want to jump in a Delorian and see some fashion forward ideas you can do now?

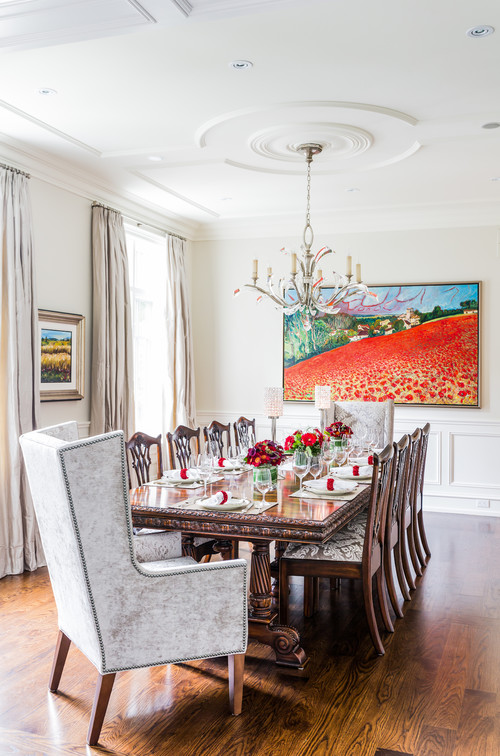
Host with the Most (Chair!)

One of the easiest ways to add a bit of pop and break up the sameness of full-blown dining room furniture sets is to swap out the two captains’ seats for a fabulous wing pair chair, or another statement chair. This is a particularly great option if you have inherited a classic set from a cherished grandmother and want to add in some whimsy and on-trend home décor without sacrificing heirlooms or memories.

Colour Me Happy

Colour, oh beautiful colour, how you make us happy! When it comes to a dining room table with different chairs, it seems like the opportunities are endless when colour comes in. Here are a few examples of how you can play with colours in your dining room.

  • Same chair, different colours
  • Same colour, different chairs
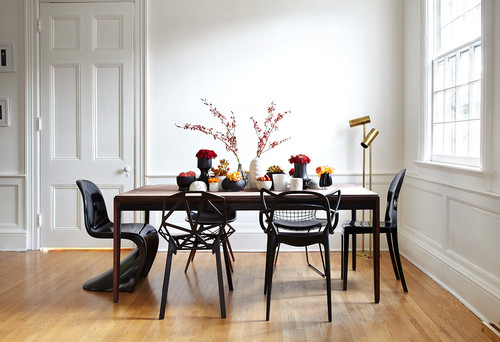
  • Different chairs, different colours

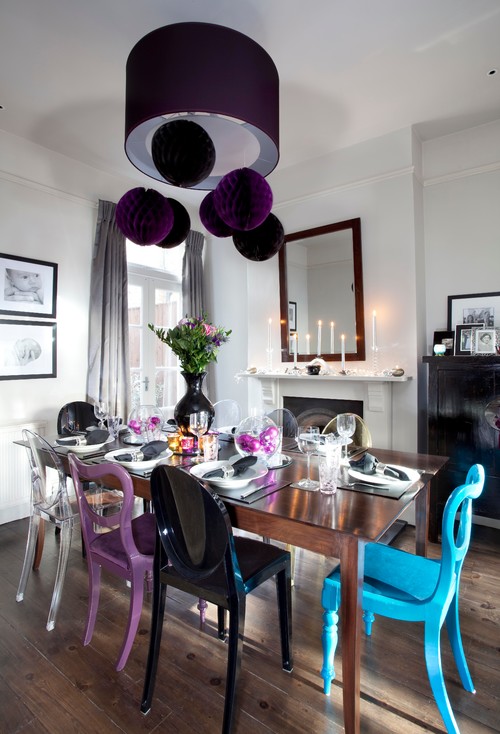
Find a colour, chair, or colour and chair combination that speaks to you and enjoy the happiness colour brings. A fun way to pick colours for your chairs and to look at what colours your favourite dishes and serving pieces are, this way your table-scape will always be Instagram-ready.
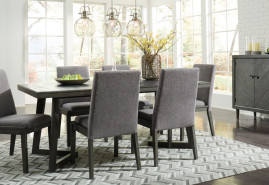
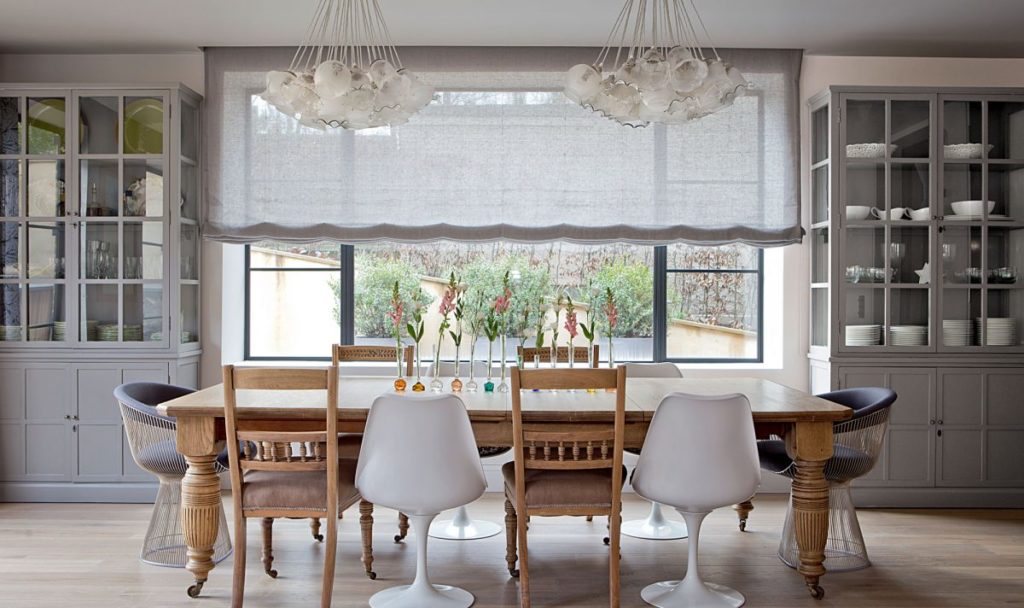
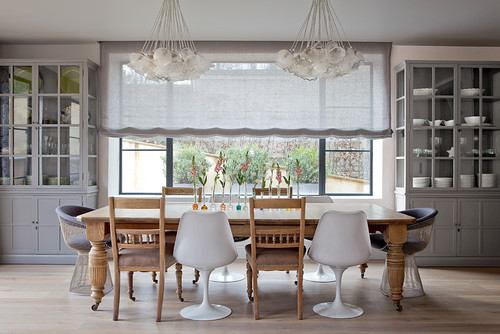
Mix It Up

Throw a bench in, use multicoloured chairs on the other side, and have the hosts flanking the table in style. Maybe add in a high backed sofa bench or some table height stools. The options really are endless when it comes to this mix and match dining room trend. Canadel has some really lovely on-trend pieces of dining room furniture that work really well as stand-alone items in a mix and match dining room.
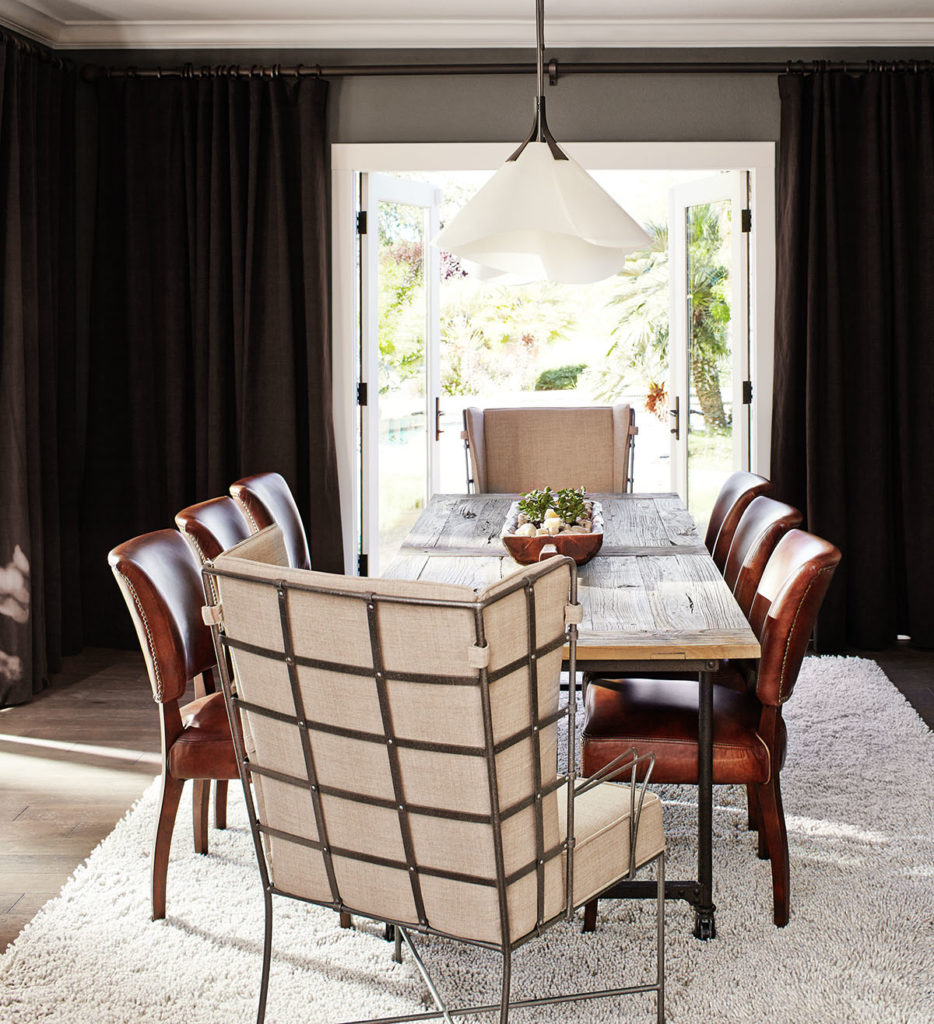
Accents Galore!

We all dream of hosting the Pinterest perfect party, but ugly folding chairs from the basement don’t really help that dream stay alive. Draw from around the house (as long as they are table height) and grab all your accent chairs to create a look worthy of a spread in the latest Anthropologie catalogue.

Inspired? Shop our dining room chairs and tables to find the perfect addition to your new dining room.

Looking for more dining room inspiration? Find it on our blog.

Rebecca, Your Furniture Expert

What Causes Sleep Paralysis and How Beautyrest Mattresses Can Help

What Causes Sleep Paralysis and How Beautyrest Mattresses Can Help

Anyone who has experienced sleep paralysis knows that it’s not a fun experience. It can feel like a waking nightmare—you open your eyes in the middle of the night and realize that you can’t move or speak. Sometimes you struggle to breathe like something is sitting on your chest, and it often causes hallucinations of an intruder or threatening presence in your room. While the experience can be scary and uncomfortable, it’s actually quite common.

There’s no comprehensive study on sleep paralysis yet, but some researchers believe as many as 65% of people may experience sleep paralysis at some point. For most people, it will only happen once in a lifetime, but for some, it’s a recurring nightmare. Sleep paralysis isn’t dangerous and it’s not necessarily a sign of any outside health problems, but most people find it extremely unpleasant.

Luckily, there are ways to cut down on your risk of sleep paralysis, from your lifestyle to the mattress you sleep on.

What Causes Sleep Paralysis?

Sleep paralysis typically happens while we’re in REM sleep. Typically, we have our most active dreams during this period of deep rest. Our brain also shuts down our major muscle groups during this stage of sleep, locking us into place so that we don’t move around too much while we’re dreaming. Normally, we’re so deeply asleep that we don’t even notice this temporary paralysis as it happens, but when the transition between REM and other stages of sleep doesn’t go smoothly, problems can arise.

Sleep paralysis is what happens when we come out of that deep sleep before our brain has had time to unlock our muscles. Doctors aren’t sure exactly what causes this misstep, but everything from sleep deprivation to medications to disorders like anxiety and sleep apnea have been pointed to as contributing factors to sleep paralysis.

How to Prevent It

Some research has shown that sleeping on your back and repeatedly waking up in the night might increase the likelihood of sleep paralysis. An irregular sleeping schedule can also put you at risk for waking up during REM. One of the best ways to ensure a good night’s rest and comfortable side-sleeping is a good mattress. Beautyrest mattresses are a great option to stave off sleep paralysis and other sleep problems.

Many modern mattress conveniences were actually invented by Beautyrest, like king and queen-sized beds, as well as the hybrid mattress, which mixes traditional springs with cushy layers of memory foam. The foam conforms to the body making side-sleeping more comfortable and can lessen the effects of sleep apnea, which has been linked to sleep paralysis. Firm but cushy memory foam can also decrease the likelihood of being woken up by a sleeping partner.

Scientists and doctors are still trying to learn more about why sleep paralysis happens and how to prevent it, but for now, getting a good night’s sleep on a comfortable, supportive mattress is the best way to move smoothly through the stages of sleep and keep paralysis at bay.

Gerry, Your Sleep Expert

9 Ways to Fall Asleep Faster in Your Sealy Mattress

9 Ways to Fall Asleep Faster in Your Sealy Mattress

Sealy beds are specially designed for comfort and support. Their four lines of Posturepedic mattresses are carefully created with reinforced centers to better support your back and keep you from tossing and turning in the night. But no matter how comfortable your bed is, there are always going to be some nights you just can’t get to sleep. Here are some tips for nodding off quickly that are a little more interesting than counting sheep.

Meditation

Meditation can be a great way to unwind after a long day. To get your mind and body ready for rest, try a few relaxing stretches and envision a calming image, like a creek or a big open field. If you’re having trouble clearing your mind of the day’s worries, there are plenty of videos online that can help guide you to your inner Zen.

Read a comic book

Comics aren’t just for kids anymore, and they can be a great way to relax and unwind. There are comic books and graphic novels about just about everything these days, from your traditional superhero comics to autobiographies, so you’re sure to find something that interests you. Just lean into your pillows, get cozy, and read until you feel your eyelids start to droop.

Have a bedtime snack

If you’ve got the munchies and all you can think about is raiding the fridge, there are a few snacks that can help lull you to sleep. A light, herbal tea like chamomile can be great for helping you get to bed, and fruits like kiwis and bananas produce hormones that can promote a more restful night of sleep. Snacks rich in magnesium, like almonds and cashews, are also known for their soporific qualities.

9 Ways to Fall Asleep Faster in Your Sealy Mattress

Play cards

Teach yourself a new game! Solitaire (with real cards, not the one on your computer) is an age-old way to keep boredom at bay. Or if you have a bedmate who also struggles with insomnia, you can try some other card games. Challenge yourself and try to remember the rules to games like Go Fish and Crazy Eights without looking them up.

Tidy up around your bed

When was the last time you cleaned under your bed? If you’re like us, it’s probably been longer than you’d like to admit. If slumber is evading you, try a little tidying up the area around your bed. Who knows what might have gotten lost under your Sealy mattress? Go hunting for loose change or other trinkets that may have disappeared into some dark corner under your bed.

Listen to a podcast or audiobook

Listening to a favourite book or new podcast can be a great way to relax. Everyone loves a bedtime story, and audiobooks let you enjoy your favourite stories without even having to turn your lights on. Podcasts are another fun, free way to wind down at the end of the day, and you’ll usually learn something new while you’re at it.

Write your thoughts in a journal

If your head is too full of your daily worries to focus on counting sheep, you might want to try journaling. Whether you have a nice notebook for the purpose or just a stack of Post-It notes, it can be a relief to get all your thoughts out on paper. Just pick up a pen and let all that stress out of your head!

Make some crafts

I know what you’re thinking, and no, you don’t have to turn your bed into a mess of glitter and glue for this one. There are plenty of crafts that require little to no cleanup that can be relaxing and fun. Teach yourself to knit or make a friendship bracelet (remember those?) with some spare bits of string. Adult colouring books are all the rage these days, and a little colouring session before bed can work wonders.

Go Wikipedia page-hopping

Research shows that screen time can actually keep us awake longer, but if you just can’t resist hopping on your computer, try to avoid anything too stimulating, like watching TV or surfing Facebook. Wikipedia page-hopping is one weird way to scratch the internet itch without getting sucked into the web for hours. Here’s how it works: select the “random article” option near the top left of the Wikipedia homepage, then keep clicking through to other linked articles until you find something interesting. Make it into a game and see how fast you can get to Kevin Bacon!

Angela, Your Sleep Expert

How to Clean Your Maytag Front Load Washing Machine

How to Clean Your Maytag Front Load Washing Machine

Your Maytag Washer may do a great job of washing your clothes, blankets, and towels, but it also needs a good washing from time to time. From dirt, sweat, blood, and more, your washer touches its fair share of filth.

If you don’t clean it out often, you may find that odours, germs, mould, and more are starting to take over your front load washing machine. With a little assistance from a natural ingredient such as white vinegar, you’ll get your Maytag Washing Machine cleaned in no time!

Spray Time

Take some of your white vinegar and pour it into a spray bottle, creating a convenient way to get the cleaning product where you need it. Then, you’ll want to spray it everywhere inside the laundry appliance. Spray it on the barrel walls inside the washing machine as well as along the gasket, and even the inside window. Let it sit for a little while before starting a cycle. This will allow the vinegar some time to really soak the scum so it’s much easier to remove.

Drain Plug and Filter

While the vinegar is working its magic on the inside of the Maytag Washer, move onto the drain plug and filter. This should be located somewhere near the bottom of your washing machine, depending on which model you have.

Once you’ve found your drain plug and filter latch, open it and lay a towel underneath. Detach your drain plug and allow excess water to pour out. Be prepared to find bobby pins, hair, and other things that pour out. Once everything has come out, put the drain plug back in its place and remove the filter which should be right next to it. Wash it in your sink with a toothbrush or a sponge to efficiently clean and rinse off all the gunk that it may have caught. Once that’s cleaned, put it back where you found it.

How to Clean Your Maytag Front Load Washing Machine (2)

Return to the Inside

Get a warm wet rag and wipe down the inside of the washing machine. That includes the inside window, the gasket, and the inside lining of the washing machine. Really clean the gasket because that is where a lot of water is harboured creating mould and mildew.

Once that’s complete, you’ll want to start a cycle to thoroughly clean out the inside of your Maytag front load washer. Open the place where you put your laundry detergent and instead fill it with vinegar. Start a long and hot cycle, allowing your appliance to wash out more bacteria from inside.

Clean the Surface

Last but not least, while your cycle is going, wipe down the outside. Feel free to use your vinegar spray or use an all-purpose cleaner to get the job done. Once your cycle is done, your Maytag washing machine will be ready for your next load of laundry.

Don’t wait for your Maytag Front Load Washer to start smelling before you clean it. Give it a good wash every couple of months to keep your garments looking and smelling fresh.

How Long Should Your Samsung Appliances Last?

Do you have a fridge that keeps breaking down and leaking? A washing machine that seems to constantly need new parts? It’s hard knowing whether you need to rush out and purchase new appliances or if it’s time to let go of the ones you have and replace them with a shinier model.

Appliances aren’t always the cheapest of items, so getting some that will last you a long time is ideal. Fortunately, when it comes to luxury appliances from Samsung, you’ll find that they’re built to last. If you’ve been dealing with some major appliances that look to be on their way out, find out here if that’s the normal life expectancy or if your appliances should be living much longer.

Refrigerator

Arguably one of our most important appliances, if your refrigerator goes out, so do you – straight to a restaurant and straight into debt. Refrigerators tend to make it to the old age of 15 years, sometimes less time and sometimes longer. Normally, you stop using a refrigerator appliance when it suddenly dies, but it’s usually better to replace it before that day comes.

Once your refrigerator goes out, your food that needs to stay at a cooler temperature starts going bad, and you end up with a complicated mess on your hands. Prepare yourself for the worst and if it hits 15 years, replace your refrigerator ASAP.

Dishwasher

This appliance may not be the worst one to fall apart – especially since it’s not impossible to wash your dirty dishes by hand. But having a working dishwasher at all times is better than one that is out of service. On average, most dishwashers tend to break down around the 10-year mark. Keep your life easy, and get a Samsung Dishwasher when your current one starts acting up.

Washer and Dryer

If you have a family dependent on the washer and dryer, then you probably don’t have time to be making trips to the laundromat. Owning a hard-working washing and drying machine is a luxury that we sometimes take advantage of. The truth is, they won’t last forever, and you’d better have a backup plan for when that time comes. Probably not for 8-12 years.

How Long Should Your Samsung Appliances Last_2

Range

Imagine a scenario where you’re preparing for a big party, but just as you start to cook, the stovetop on your range doesn’t start. When you try to preheat your oven, it also doesn’t seem to warm up. This would be a disaster of a situation, which is why buying a new Samsung Range before your current one goes kaput would save you from that nightmare. Most ovens, cooktops, and ranges last about 10-15 years.

You’ll never appreciate a perfectly working appliance until you’ve had one break down. Updating your appliances will not only bring some relief to your life, but it can also help you save money due to new and innovative advancements in energy and water efficiency. Replace your out-of-date hardware with Samsung appliances so you never have to go a day feeling inconvenienced.

Amanda, Your Appliance Expert

5 Ways to Clean Your KitchenAid Dishwasher

5 Ways to Clean Your KitchenAid Dishwasher

If you’re like us, you don’t like to spend any longer washing dishes than you absolutely have to. With a KitchenAid dishwasher, your dishes are done so quickly and quietly you might even forget it’s running. But your dishwasher is working hard scrubbing gunk and grime every day, and every now and again, it needs a good clean too. Follow these five tips to keep your dishwasher squeaky-clean and running smoothly.

1) Outer Beauty

The exterior of your KitchenAid might not be doing the dirty work of cleaning dishes, but you don’t want spilled food and water stains to hide the stainless-steel finish. Glass cleaner is great for getting tough grime and smudges off the surface of your dishwasher. Just don’t spray the cleaner directly onto the machine – the moisture could damage the electronic controls. Instead, spray onto a clean cloth and apply to the front.

2) What’s on the Inside Counts

You’d be surprised how much junk can get trapped in your dishwasher’s drain without you even noticing. Old bits of food and trash can gum up the works, keeping your dishes from getting a complete clean. When you crack open the dishwasher, you’ll want to start by cleaning out the filter.

KitchenAid dishwashers have a removable triple filter system that you can access by removing the bottom rack. Just twist the cylindrical upper filter counterclockwise, then lift out the mesh lower filter from under the propeller. No need for coarse scrub brushes or scouring pads, just rinse them both out under running water, and use a soft brush for ground-in debris.

3) The Secret Ingredient

It turns out, you don’t need expensive cleaning products to clear the gunk out of your dishwasher. All it takes is a bit of white vinegar. Leave a dishwasher-safe mug or measuring cup filled with two cups of vinegar on the bottom rack of your dishwasher, and run a normal wash cycle.

The acidic vinegar strips away all the hard-to-reach soap scum and food particles. Don’t add any detergent – the vinegar gets the job done all by itself. It’s effective, but be sure not to take this step more than once a month – too much vinegar could damage the interior of the machine.

5 Ways to Clean Your KitchenAid Dishwasher_2

4) A Sparkling Finish

To flush out any lingering odours, give your KitchenAid one more rinse with baking soda. After you’ve thoroughly cleaned the machine with vinegar, sprinkle baking soda all over the bottom of the dishwasher and run one last cycle. You should use the hottest water you can. This will leave the dishwasher sparkling clean and smelling fresh.

5) Daily Upkeep Works Wonders

Cleaning your dishwasher every once in a while is just a fact of life if you want spotless dishes and an odour-free kitchen, but you can take steps in between washes to keep your KitchenAid fresh and functional. Your sink is usually linked to your dishwasher, so run your disposal before starting a load of dishes to keep gunk from the sink from getting mixed into the wash. Also, checking the drain for large bits of food and debris after every cycle can help prevent buildup before it starts.

Amanda, Your Appliance Expert

5 Simple Tips to Keep Your GE Cooktop Clean

5 Simple Tips to Keep Your GE Stovetop Clean

GE cooktops are the name of the game when it comes to high-quality cooking appliances. Electric, gas and induction cooktops from GE Appliances come in a variety of shapes, sizes, and designs to suit all your cooking needs.

But with all the cooking you’ll be doing on your GE range, how do you keep your appliance clean and free of food and oil buildup? Here are a few quick tips to keep your cooktop looking brand new.

Daily Maintenance

A messy cooktop can do more than ruin the look of your kitchen—it can also be dangerous. A buildup of food and grease on cooking grates can become a fire hazard. Grime stuck in the burners or on the cooktop surface can also keep your food from heating evenly and ruin your meal. This kind of messy buildup can be easily prevented by giving your cooktop a quick wipe down after every use.

Act Fast

Oil and grease stains are easiest to clean if they’re still wet. That means jumping into action as soon as you notice a spill.

Wet oil spills can be cleaned up by simply dusting them with cornstarch, flour, or baking soda. Let it sit for about 15 minutes, then wipe it right up with a paper towel. If the spill has already hardened, pour on some dish soap and let it soak for a few minutes before going to work with a sponge. Try to avoid using anything too abrasive that might damage your cooktop, especially if you have an induction stove.

Start Simple

Most cooktop messes can be cleaned with simple soap and water. If you have a traditional gas range, start by removing the grates over the burners and soaking them in a solution of hot, soapy water. This should break down most of the grease and food particles and allow you to wipe the metal clean with a sponge or scrub brush.

Electric or induction cooktops can typically be cleaned easily by wiping them down with a bit of dish soap or cooktop cleaner, hot water, and a sponge. Just make sure the stove has cooled before getting started. This should do the trick on most cooktops, but for tough stains, you might need to step up your game.

Getting Tough on Stains

If your cooktop has too much baked-on gunk to clean with simple soap and water, there are a few more tried-and-true methods that should restore its natural shine. Vinegar is one of the most popular ways of cleaning up tough stains.

Just spray down the burners and cooktop with some white vinegar and allow to sit for about 20 minutes before wiping off with a clean cloth. Baking soda can also be effective—just make a paste out of water and baking soda and spread it on any tough stains. Let the mixture sit for about 20 minutes, then scrub it all away with a sponge or brush.

Restoring Sparkle

When all the grime is removed from your cooktop, you’ll want to do a final polish to remove any soap streaks. Wipe down any stainless-steel surfaces with a bit of rubbing alcohol and cloth to leave your GE Appliances looking brand new. Be careful—alcohol is flammable, so make sure it’s all evaporated before using the stove.

Amanda, Your Appliance Expert

4 Steps to Clean a Whirlpool Washing Machine Filter

4 Steps to Clean a Whirlpool Washing Machine Filter

Even though Whirlpool washing machines have the ability to efficiently clean clothes at lightning speed, it doesn’t mean they can do the same for themselves. Washers need a good washing too, especially when it comes to the washing machine filter.

The filter is one of the most important parts of the cleaning process because, without it, your washing machine pump would get clogged easily. By cleaning the filter, you protect your washer from lint, coins, hair, and so many other clog-worthy obstructions from getting through. By cleaning the filter, you protect your washer from breaking down.

Follow these steps when you decide to clean out your Whirlpool Washing Machine filter:

Step 1: Locate the filter

Your first step is to find the filter’s location. Usually, it will be on the bottom right of the washing machine, making access rather easy. Of course, your model may be different so you may need to consult the user’s manual or give your washer a quick look over to find it.

Step 2: Pull It Out

Before opening the filter compartment and pulling it out, put a washcloth under the opening to ensure no water leaks out and makes a mess. It’s normal for a little bit of water to pour out, so don’t worry if that happens to you!

Step 3: Scrub the Filter

The best way to thoroughly clean your Whirlpool Washing Machine filter is with a toothbrush. The fine bristles get in the hard to reach places and really scrub away at any grime. If you don’t have a clean toothbrush just laying around, use the rough side of a scrub and clean away.

All you need is a little warm water and soap while you wash it and your filter will look as good as new. If your filter is still looking pretty gross, just soak it. Leave it soaking in hot water and soap for a few hours before continuing your scrub job. Filters work better when they are cleaner, so the more you can wipe away, the fewer problems that will come your way.

Step 4: Don’t Forget About the Inside!

Before connecting the drain filter back to the washer, remove any debris from inside the hole where the filter will reside. You may find unwanted items taking up residence there. Remove them and then slide the filter back into its newly cleaned home. Make sure it’s screwed all the way in, and close it all up!

You may believe that cleaning your washing machine filter is a waste of time, but if you don’t, your whole washing machine could cease to function. It’s crucial that you take the time to clean yours out so your Whirlpool Washer can last a long time. Plus, not having to spend money on repairs is always a good reason to clean out your filter regularly. With a Whirlpool Washer, the job is quick and easy, so that you can spend your precious time doing the things you actually want to do.

Amanda, Your Appliance Expert

3 Tips for Keeping Your Fruit and Veggies Longer

3 Tips for Keeping Your Fruits and Veggies Longer

It seems everyone I know is trying to ‘eat better’ with more fresh fruits and veggies. We are all also trying to reduce our food waste, but with new fruits and veggies to experiment with and changing schedules, it can sometimes be hard to keep everything alive and ready to eat.

Of course, your appliances can do a lot of the work by being set to the right temperatures and taking advantage of all the drawers, doors, bells and whistles, but we have a few other handy ways for you to help keep fruits and veggies around longer so they can be enjoyed and not wasted.

3 Innovative Ways to Optimize Food Storage in a Refrigerator

1) Washed N’ Ready

For veggies like carrot sticks and celery that you want to grab‘n go, washing them, cutting them, and placing them in a container with a bit of water keeps them fresh longer and more likely for you grab (since you know they are clean and ready to munch on).

When fresh summer berries come into season I like to buy them by the bushel, but I know there will always be some mouldy mushy ones going out in the bin a few days later. To avoid this, whatever doesn’t get eaten that very first day home gets chopped and ready for fruit salad, or into a freezer bag for a quick pancake topping.

Useful Guide to Freezing Your Fruits and Vegetables

2) Store Properly

When it comes to our fruits and veggies, how and where we store them is just as important as WHO we store them with. In some cases that means storing them separately (here is a handy guide to help).

Did you know apples kept with potatoes helps keep potatoes fresher longer? But kept with bananas both the apples and bananas ripen even faster? There are lots of other great food hacks for storing fruits and veggies here.

Another great tip I learned recently was to wrap celery in tin foil. I know! But it works, I tried it. Reader’s Digest has this and 40 other crazy uses for aluminum foil.

3) Get Preserving!

The best way to ensure you keep your fruits and veggies is by preserving them in all their seasonal bounty. Canadian preserving sensations Well Preserved offer up hundreds of inspired recipes to help you start (and fall in love) with the art of preserving and reducing your food waste.

Looking for some tips on how to store your cheese best? We’ve got those here: Tips for Cheese Storage in Your Fridge.

Isabelle, Your Appliance Expert

6 Things to Consider When Buying a Dining Room Set

6 Things to Consider When Buying a Dining Room Set

When we were young, a sofa and a coffee table in front of the TV often acted as our dining room. But as we grew older, the need to have a more “formal” dining place for entertaining and/or family dinners suddenly started to make sense.

If this is the first time that you are shopping for dining room furniture, and because buying a new dining room set is a major decision, here is a list of 6 things you need to consider while shopping.

1) Space

The first thing to think about is the space you have for the table. I suggest that you draw out the room dimensions first. You will need to allow 42 to 46 inches (107 to 117 centimeters) between the table and the wall edge in order for a person to rise comfortably and push their chair away from the table.

2) Traffic Flow

Review the traffic patterns by considering where traffic enters and exits the room. Does the hostess have room to move around the table? Do you plan to serve “family-style” or will the guests serve themselves? If family
and friends are getting up and down you will require more traffic space.

The following sketch shows you how to calculate traffic flow.

Traffic flow in dining room

3) Table Size

In order to accommodate serving dishes, you will need to look at a table that is a minimum of 36 inches to 42 inches (91 to 107 centimeters). If you don’t need a large table now but would occasionally like one for those special occasions, you may want to consider a table with one or more extensions (leaves).

Your guests need to be comfortable. You need to allow 24 inches (60 centimeters) of table space per person around the table in order to ensure your friends and family can enjoy their time around the table together. For extra elbow room allow for 30 inches (76 centimeters). How many people usually sit at the table? Here’s a useful drawing to save you some time:

average dining table size New average dining table length what size table will seat 8 people

4) Table & Chair Height

Table height is another consideration. Most tables are 30 inches (76 centimeters) in height. The height of the chair seat is generally about 18 inches (46 centimeters) from the floor. In most cases the distance from the tabletop to the seat of the chair should be at least 12 inches (30 centimeters).

Tables over 30 inches, commonly known as pub-height tables (42 inches) or counter-height tables (36 inches), are also available from many manufacturers. These tables are particularly suitable for more casual environments.

Just like tables, chairs are available in various heights (for obvious reasons). Most collections will offer two heights – the highest chairs can also be used for lunch counters.

5) Table & Chair Design

Another thing to review is the leg style of the table. The selection of a custom table allows you to select what leg style suits your style preference as well as your entertaining needs. You will want to note that the selection of a pedestal style base gives you more seating space since none of your guests will have to struggle with the table legs.

When it comes to choosing your chairs, you must consider not only your preferred style but also comfort, especially if you like to spend long hours chatting around the table. The back of the chair, as well as the seat width, will determine how comfortable the chair is.

A bench is another very popular option that is perfectly suited to small spaces since it can slide completely under the table when not in use.

Depending on your lifestyle, the type of cover you choose for your chair (or bench) will be equally important. Wood, plastic and metal chairs, or one with leather covers, are ideal for young families, whereas a fabric cover, especially plain, will require more care. Fortunately, you can now find high performance fabrics that are stain resistant and easy to clean.

6) Multifunctionality

Is there some adjacent space nearby such as counter or bar height area in an open concept kitchen/dining that can be used for serving dishes or even to seat additional guests? Sometimes the younger generation likes the feel of being part of the event but appreciates the freedom that sitting at a bar stool brings.

Speaking about serving dishes – you will want to consider a server or open buffet to have those extra plates and platters readily available for that uncle who insists on a healthy second helping.

Console tables and occasional furniture are also great ways to maximize the service area of your dining room. Once the focal point of more formal spaces, the hutch over a buffet is almost no longer used.

Dining room furniture will always remain a personal choice influenced by factors such as lifestyle, style preferences, budget, space available and the number of years we wish to keep our furniture. Whatever the case, don’t be afraid to think outside the box when choosing finishes or combining unexpected elements.

Bon appetit!

Rebecca, Your Furniture Expert